A Basic Website in RMarkdown (with an R renderscript)
Just because it’s a basic website doesn’t mean it’s not an effective website. A process is discussed that helped me understand the building of a basic website in RMarkdown. Many of the basic ideas shown in this post (e.g. YAML spacing, using YAML scalar and array variables, R script for rendering, etc.) were also used in the building of this blog you are now reading.
Last Updated: Sunday, October 02, 2022 - 15:27:57.
Caveat: LaTeX vs. RMarkdown
Over the years, I have developed a fair amount of experience with LaTeX (a typesetting language for mathematics) wherein a single .tex text file is essentially compiled to a single .pdf file as seen in Figure 1. I use this LaTeX example to illustrate and set expectations about what I was familiar with before coming to RMarkdown. Namely that (a) any packages required to compile to the .pdf are included in the .tex file (in the preamble) and all the text of the .pdf is included between the \(\backslash {\tt begin}\) and \(\backslash {\tt end}\) \({\tt document}\). That’s all! At it’s simplest: one text file creates one output file. (b) White space between a \(\backslash {\tt begin}\) and \(\backslash {\tt end}\) does not generally, to my knowledge, affect the compiled output.
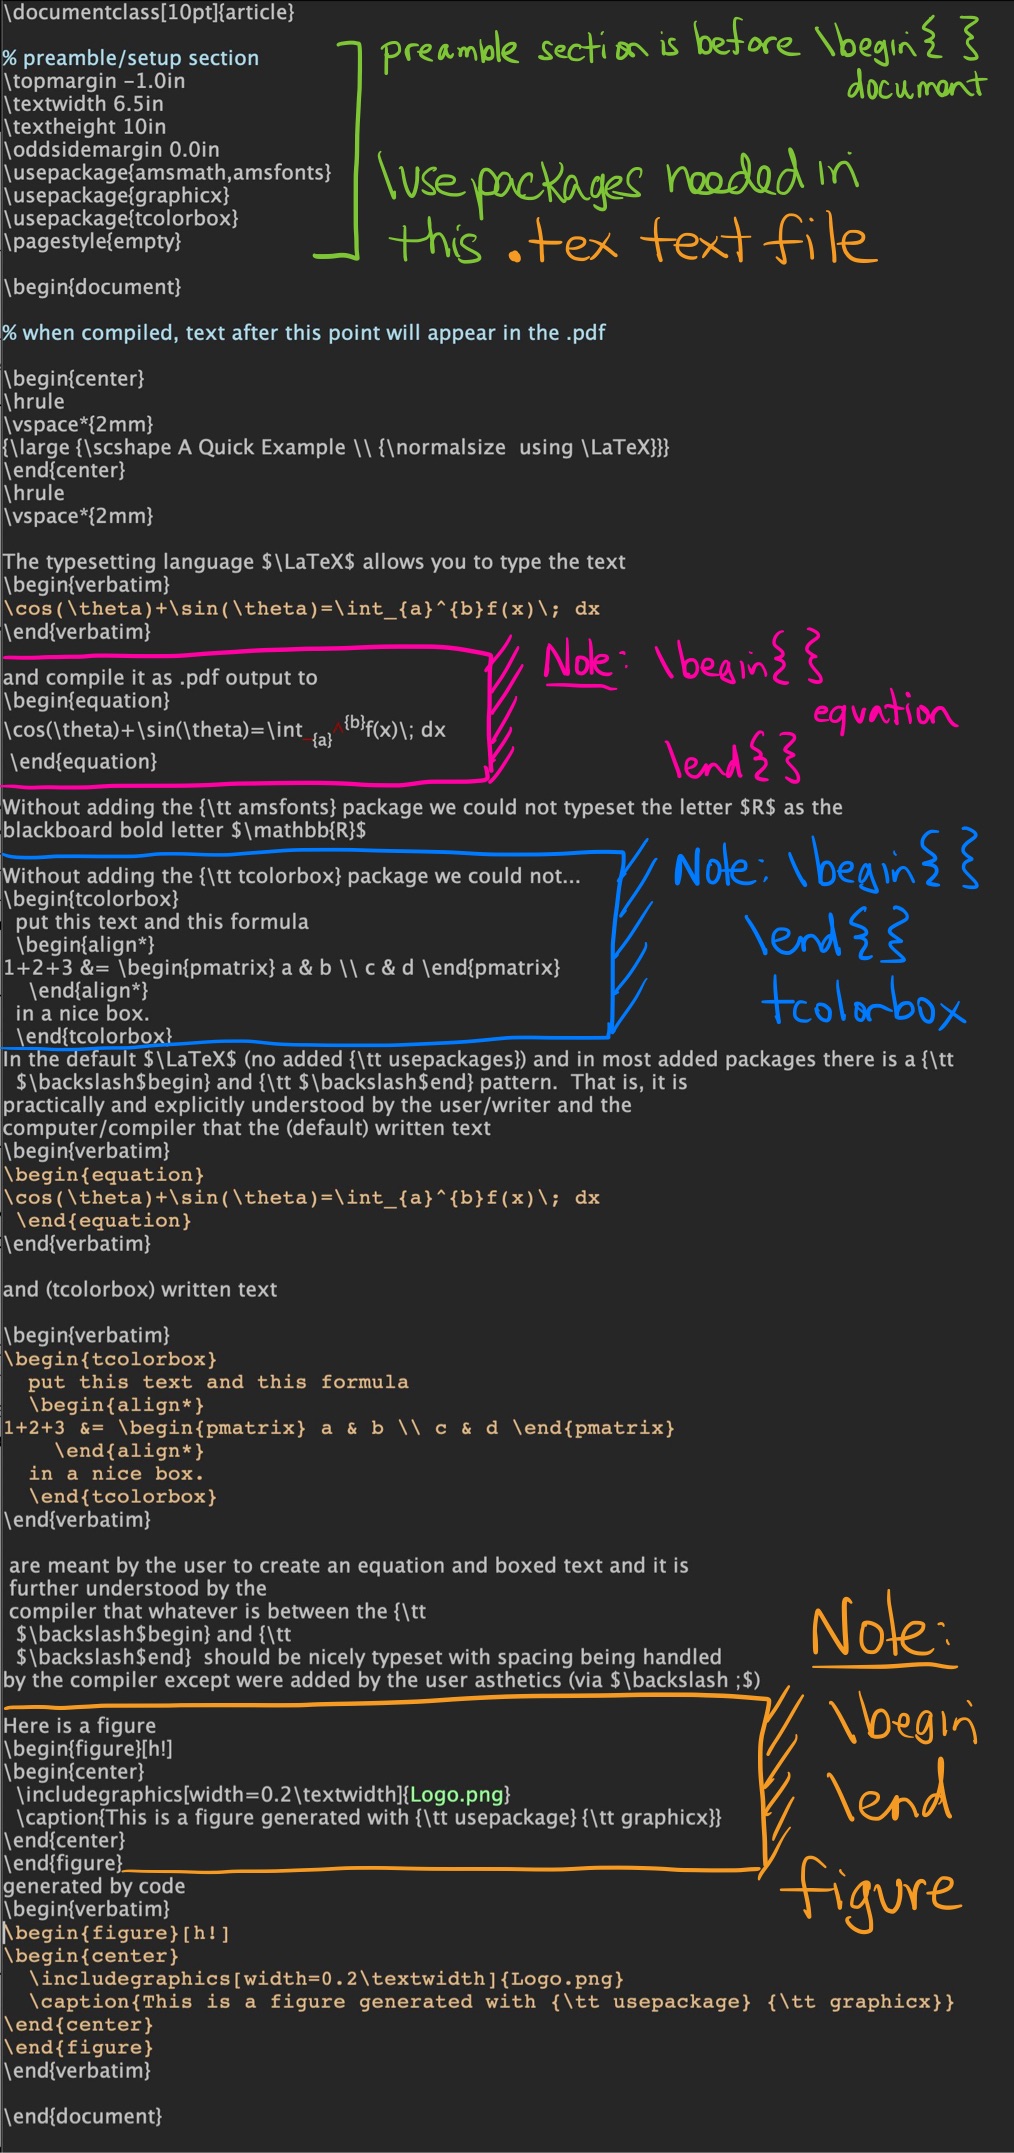
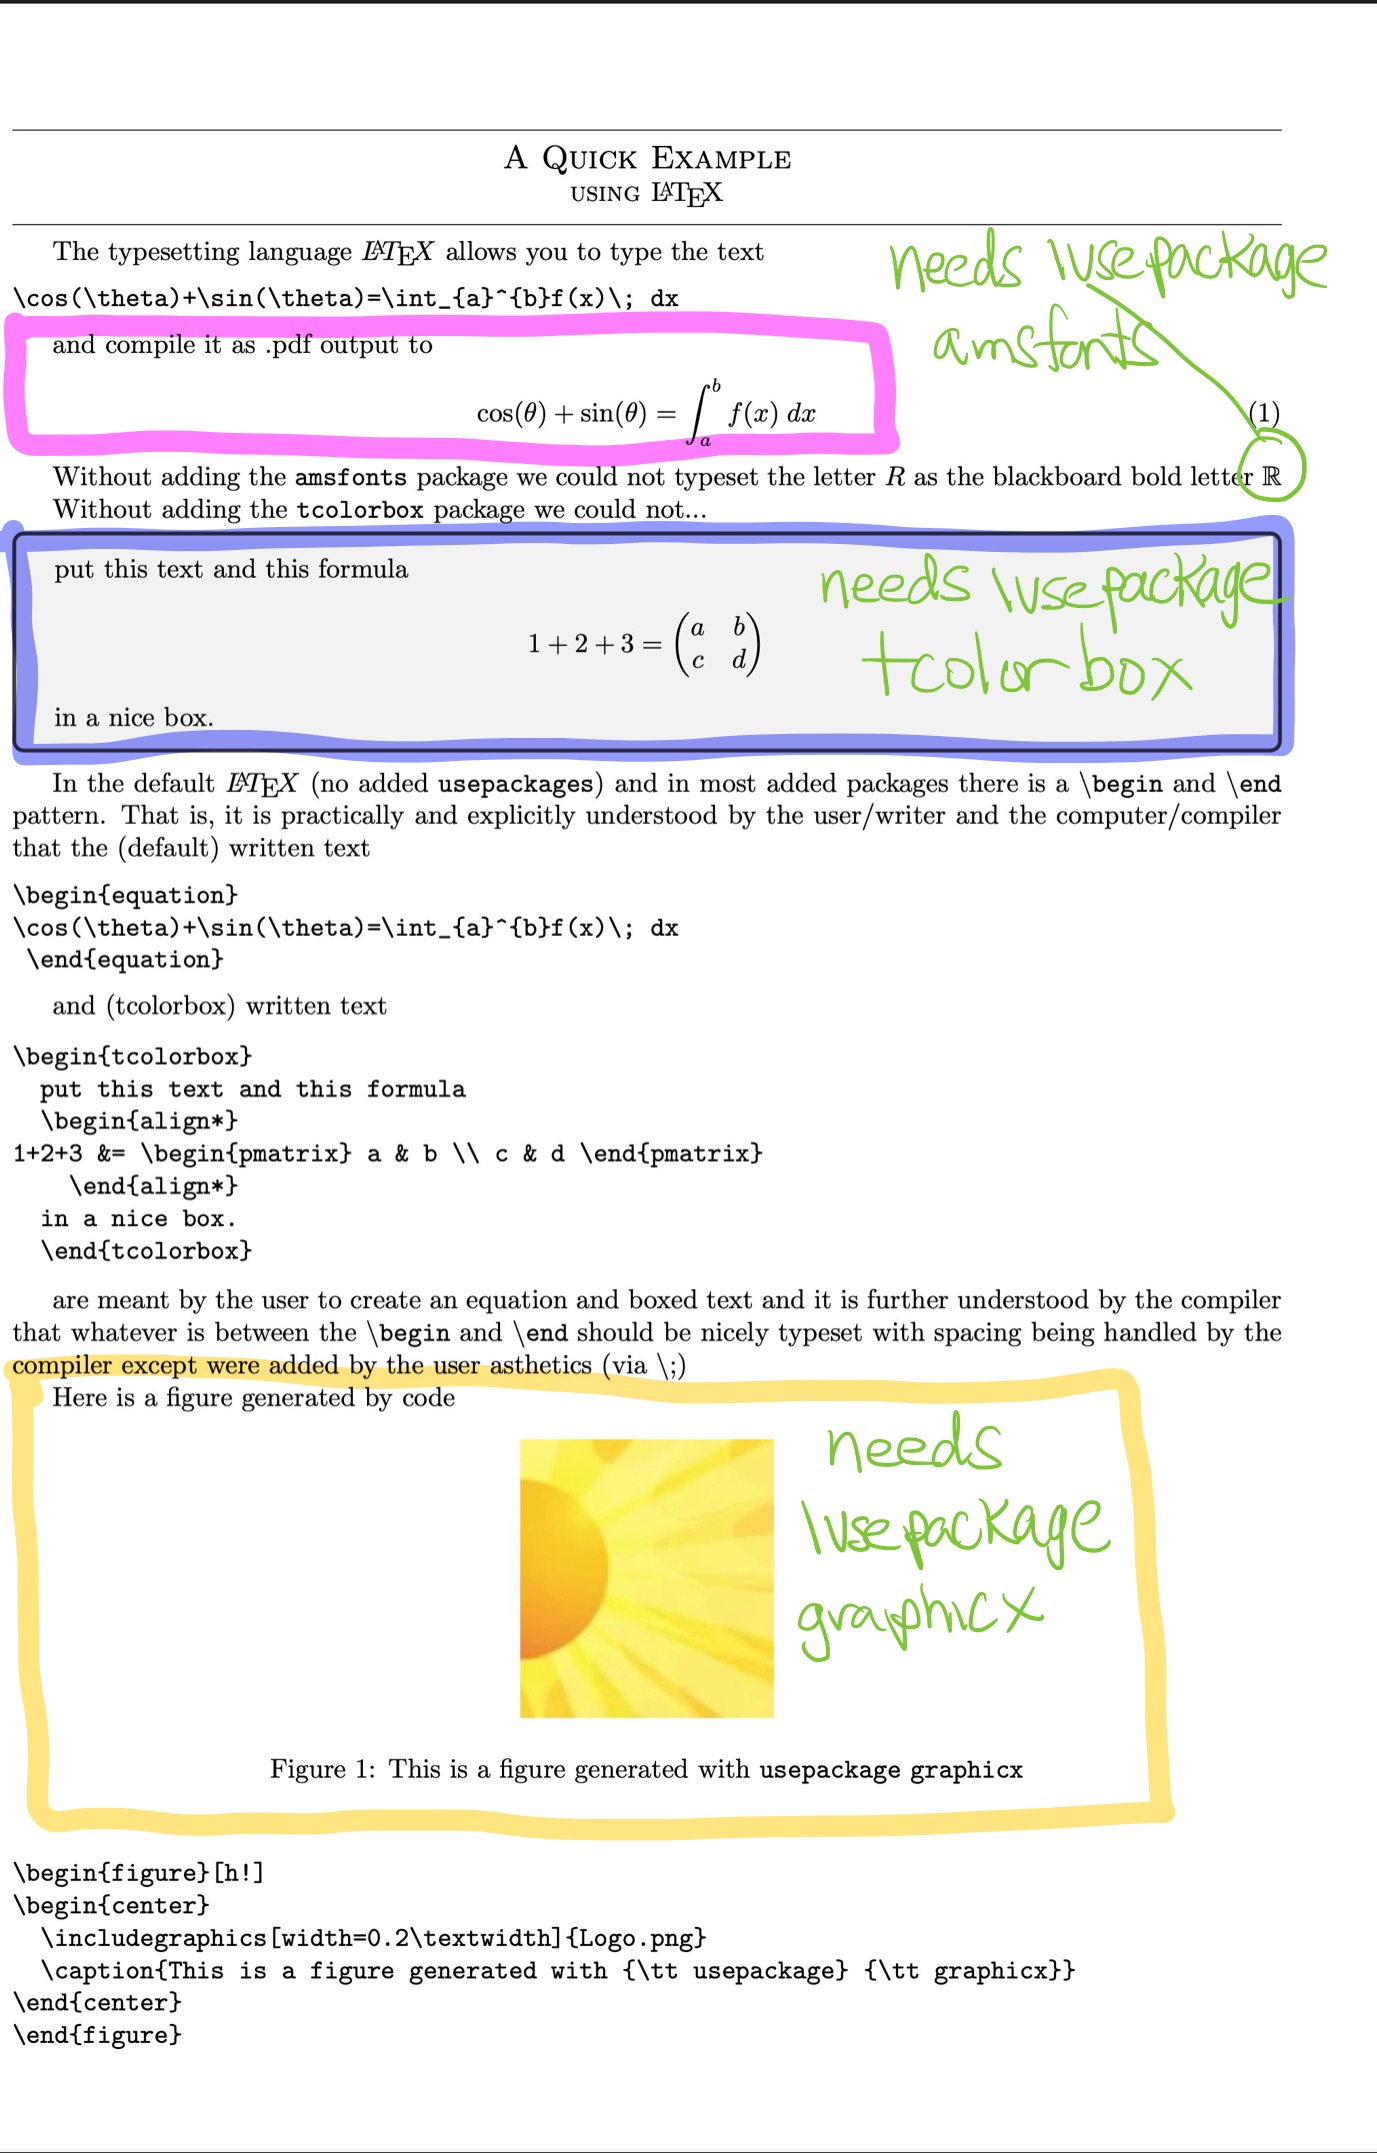
Figure 1: LaTeX Example. (top/left) This .tex text file will compile to the (bottom/right) this .pdf file
In contrast, it is my introductory experience with RMarkdown that many files (A) .Rmd (Rmarkdown), .yml (YAML), .css (Command Style Sheet) will need to play nice with each other to generate the desired .html webpage output and (B) white space, particularly in YAML, matters a lot! To be fair, this added complexity is to be expected as we are building a website in RMarkdown, which is quite a bit more complicated than creating a single .pdf file from LaTeX. Also to be fair, when learning any language, whether it be LaTeX or RMarkdown, there is syntax to get used to, error messages to decipher, and problems to solve.
Caveat: Sorry but I Have to Understand File Structure
In this post we illustrate via a minimal working example the files and organization, as seen in Figure 2, necessary for me to understand and build the basic website as seen in Figure 3.
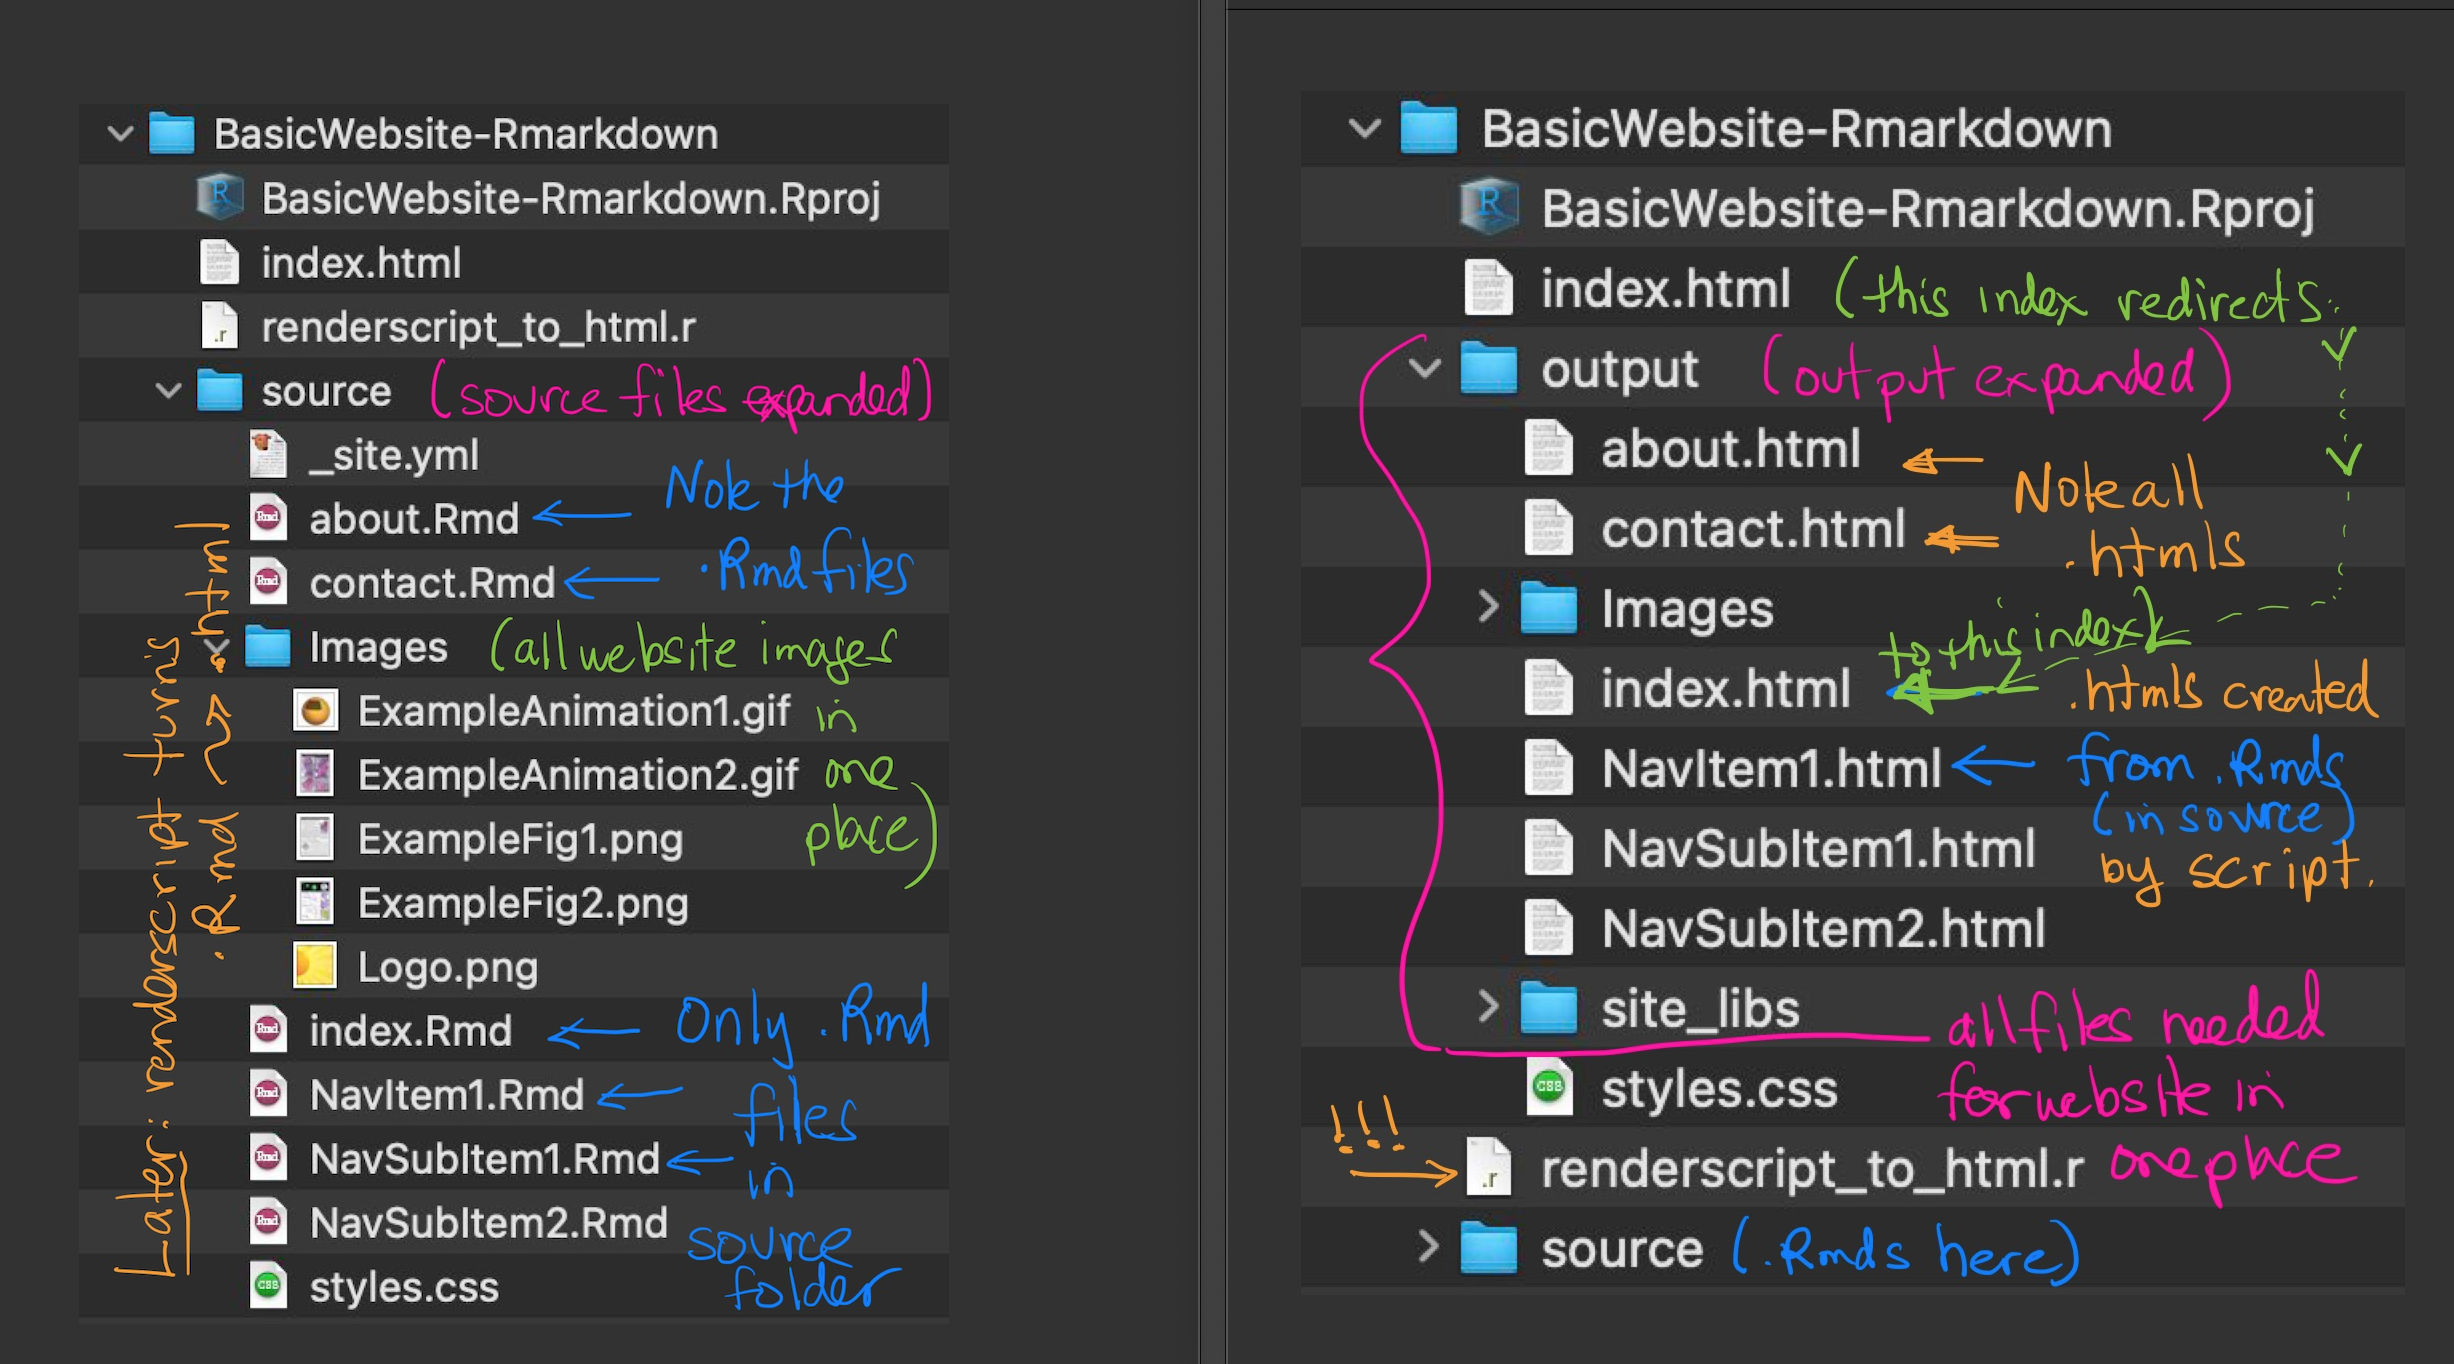
Figure 2: Basic RMarkdown Website Source and Output Files These are the source files that generate (with an R renderscript) all the output files for the site. Note that all the output files for the webpage are written into one convenient output folder. These files can be found in a public repository of my Bitbucket.
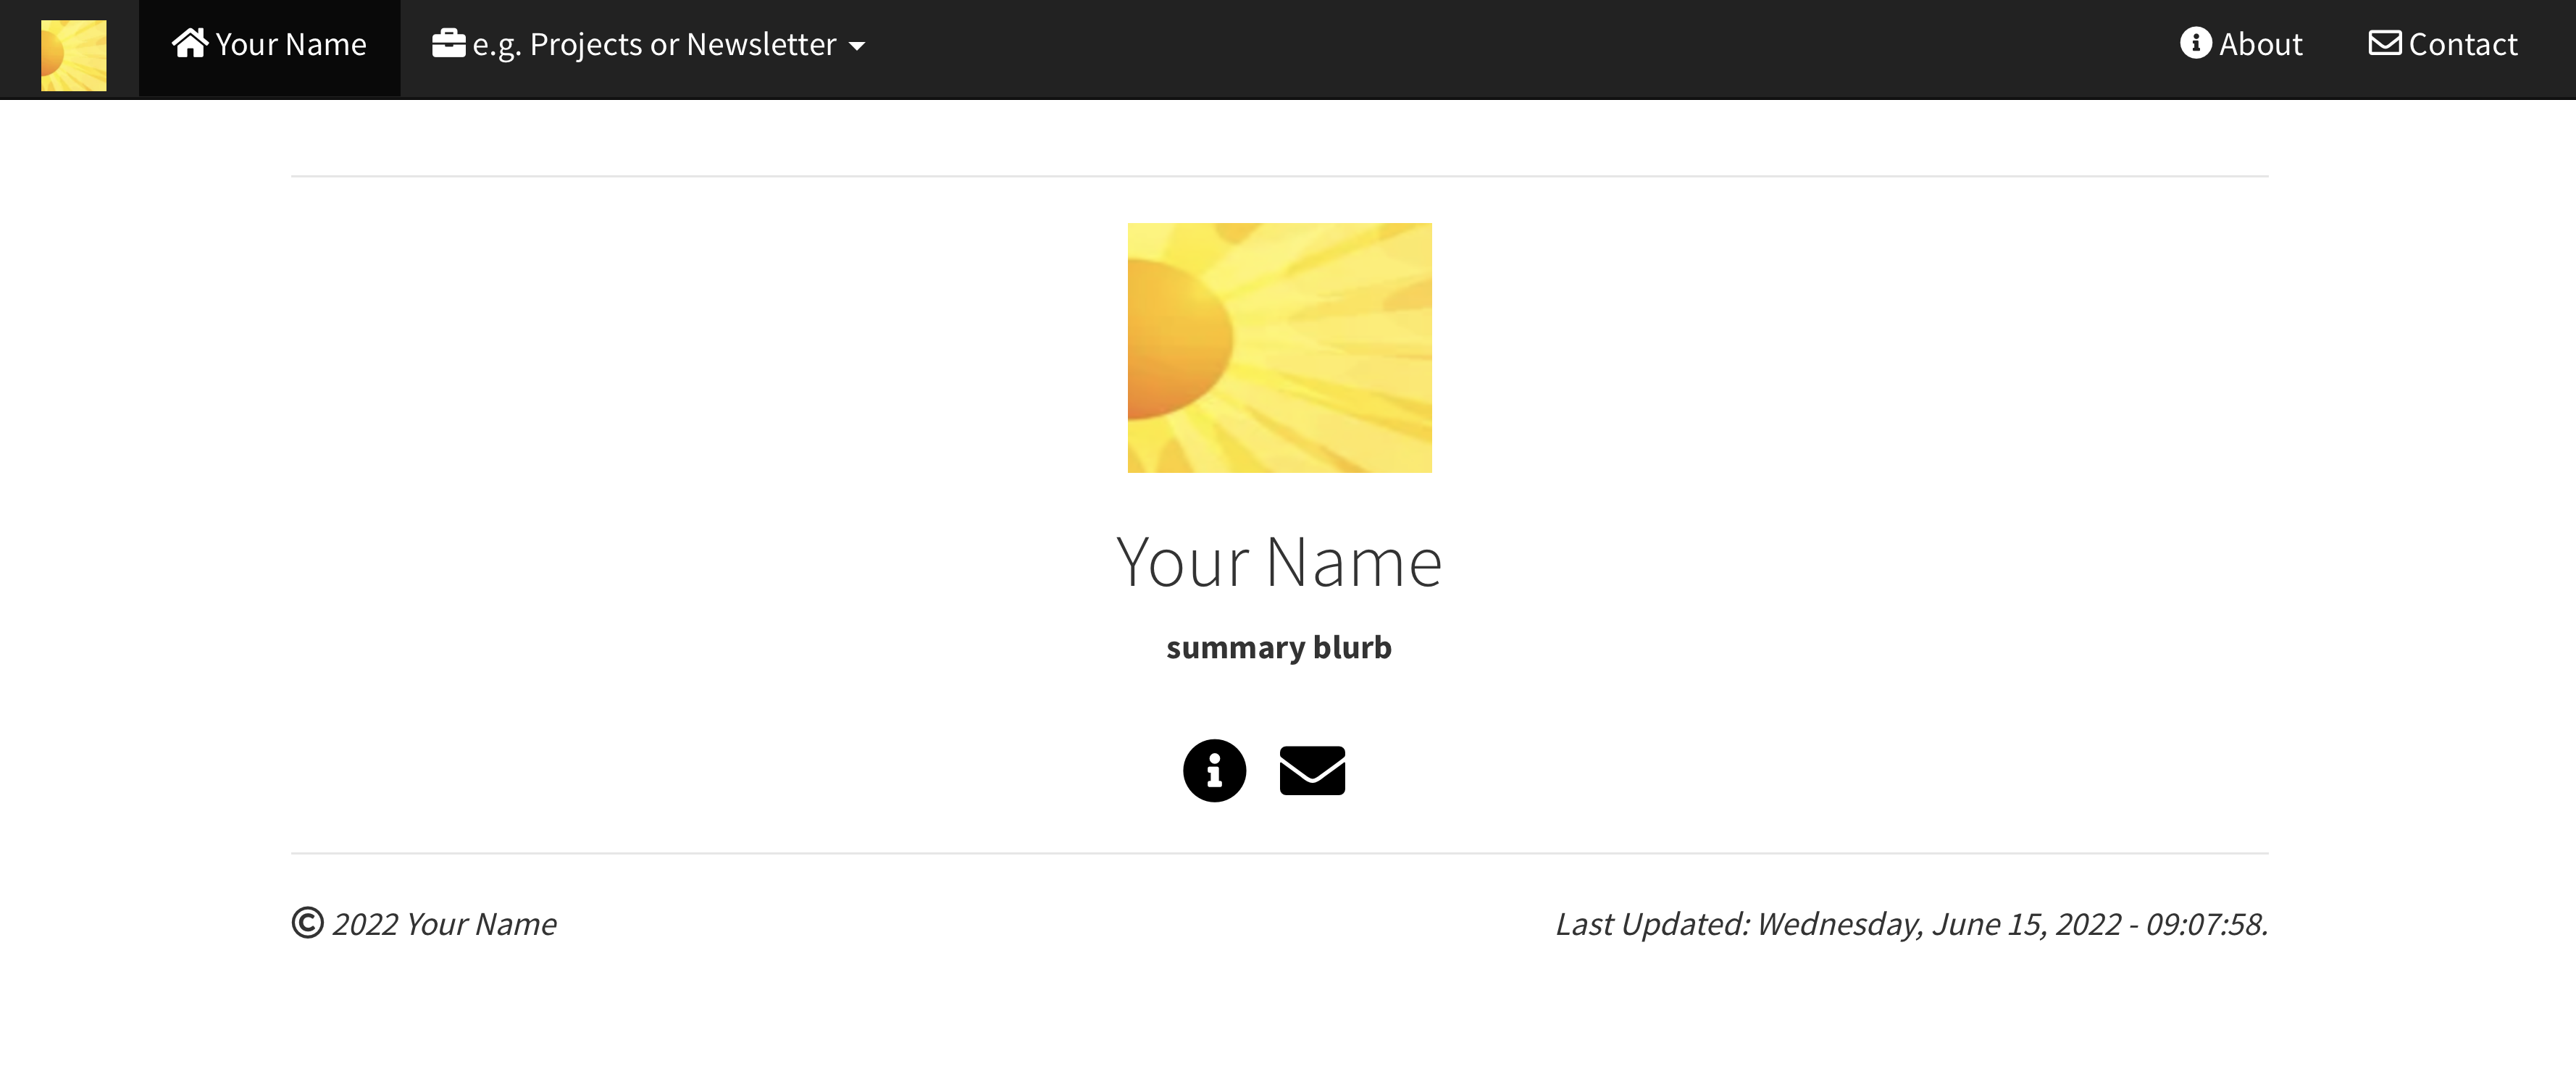
Figure 3: Basic RMarkdown Website Generated From Files in the Output Folder. Let’s Get Started
A Basic Website Deconstructed
It helped me to think of a Basic RMarkdown Website as a piece of paper with a line drawn across the middle dividing the site into two main parts: A Top Navigation Bar (_site.yml) that handles the navigation to the sites content and a Bottom Body Section (index.Rmd) which is the sites landing page.
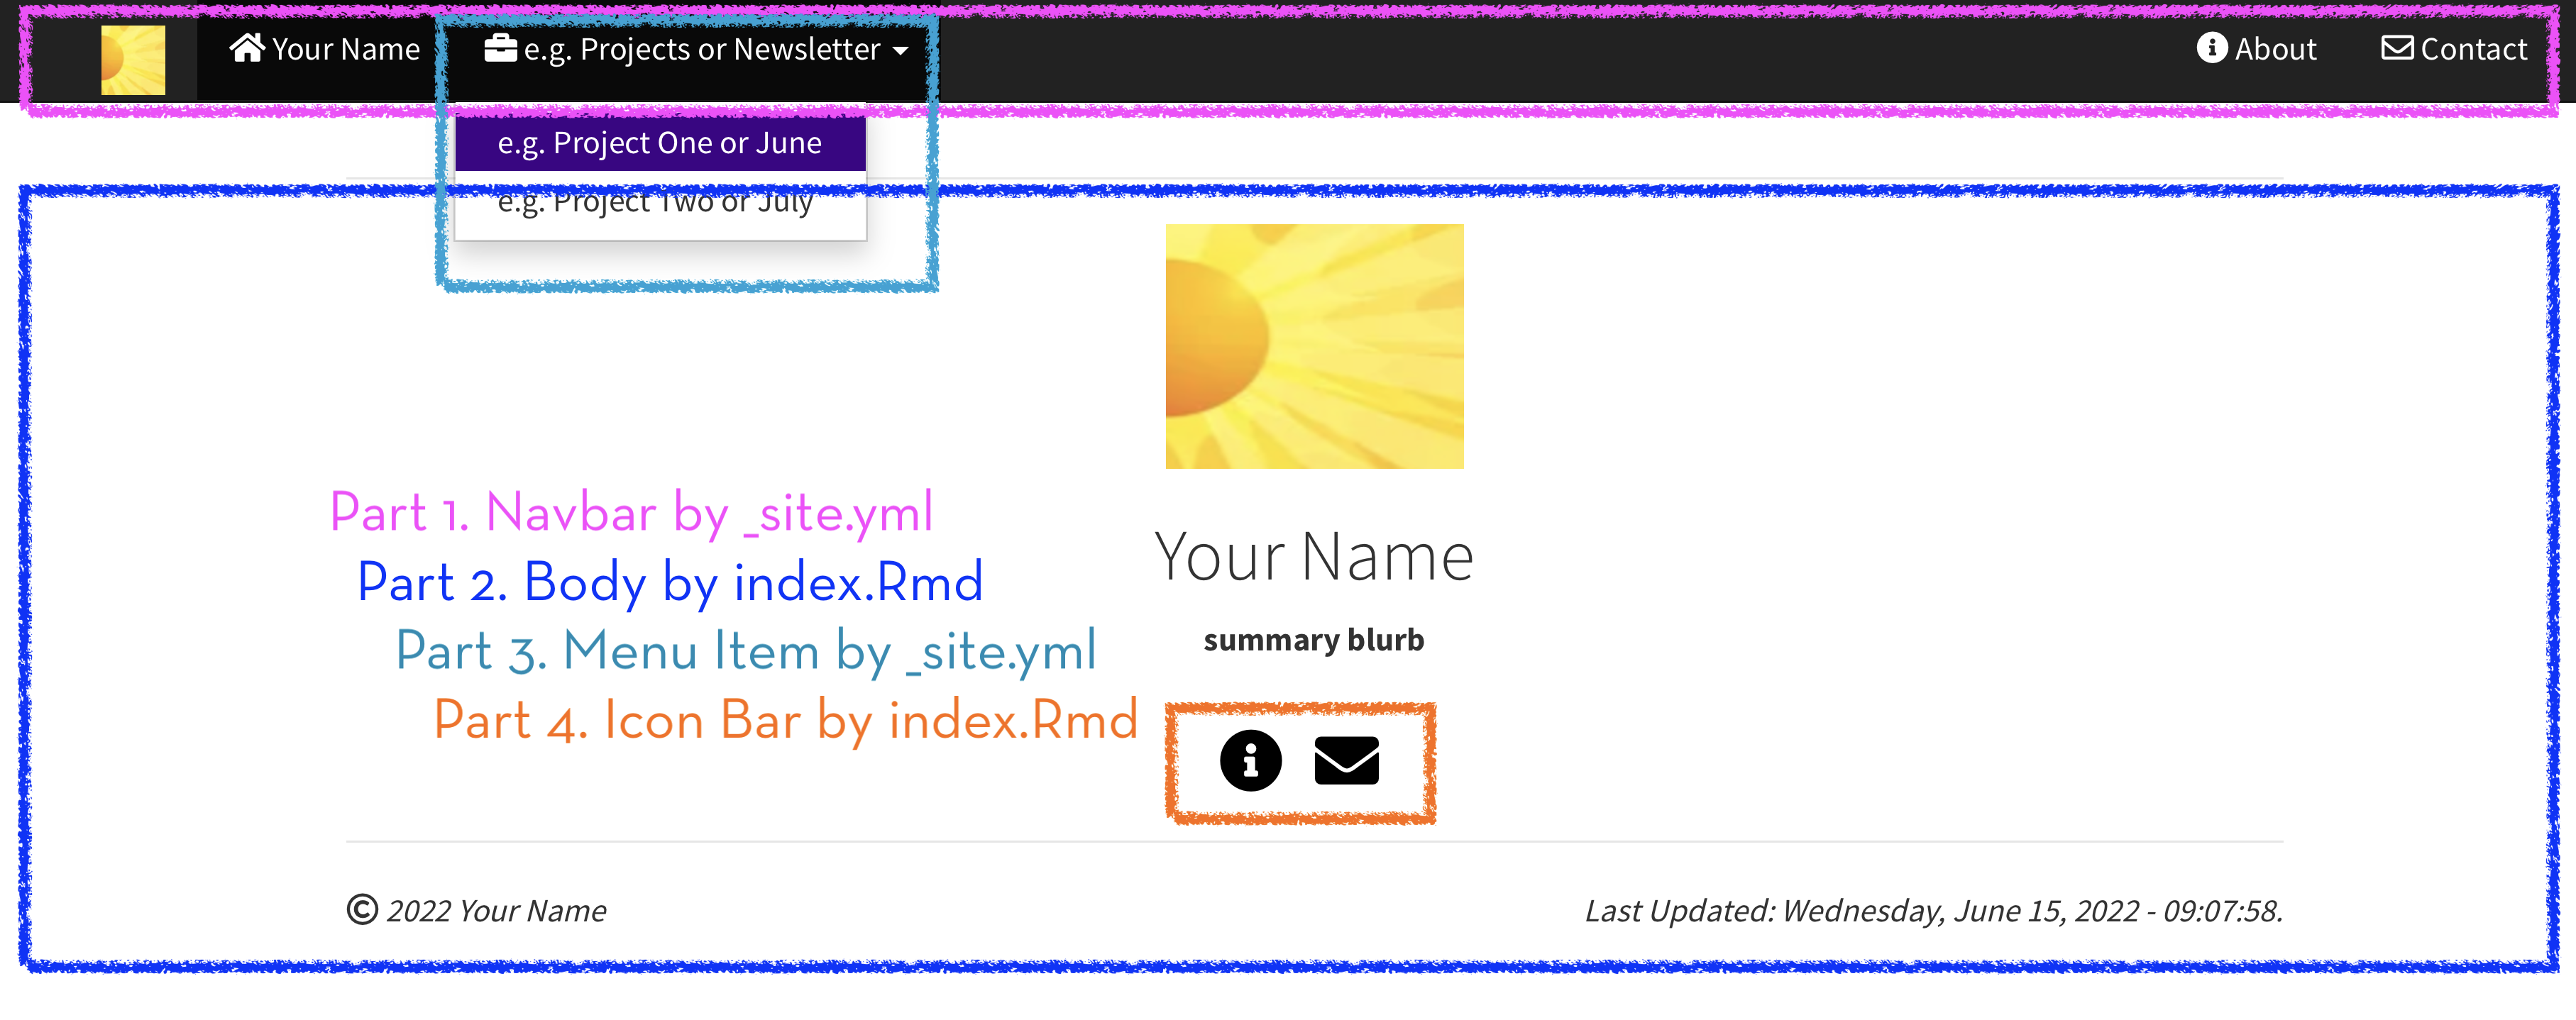
Figure 4: The Goal Deconstructed Into Four Steps (Build Navbar and Populate With a Menu then Build Body with Icon Bar) and Two Main Files (_site.yml and index.Rmd)
I must say at this point that the visual design of this Basic Website in RMarkdown is inspired by the blogs of Massimo Girondi and Gregory Gunderson which were written respectively in Hugo (with a theme based on hello-friend-ng based) and Jekyl with Liquid. Since I have only just started learning to use R, RMarkdown, Bookdown, and RStudio I thought it would be a good learning exercise to replicate some of the main features I liked from these sites using soley RMarkdown/Bookdown and YAML. This post was greatly improved from conversation with Matthew Hefner and Jill Reese (my wife extraordinaire). Not myself being a trained computer scientist or professional software developer, I learned from them the technical benefits of:
The concept of using an R script to call render_site rather than using the Knit button (on each .Rmd file!).
The general (best) practice of seperating .Rmd source files from .html output file. In this post we illustrate the use of RMarkdown render_site while in a future post we discuss Bookdown render_book.
The use of scalar and array variables combined with cat.
Modifying the Site: Add to the Navbar
The Top Navigation Bar can be added to by editing the source file _site.yml. You can add more navbar items/pages via the “text-icon-href” sequence or you can make one of the navbar items into a drop down menu of pages via the “text-href” sequence.

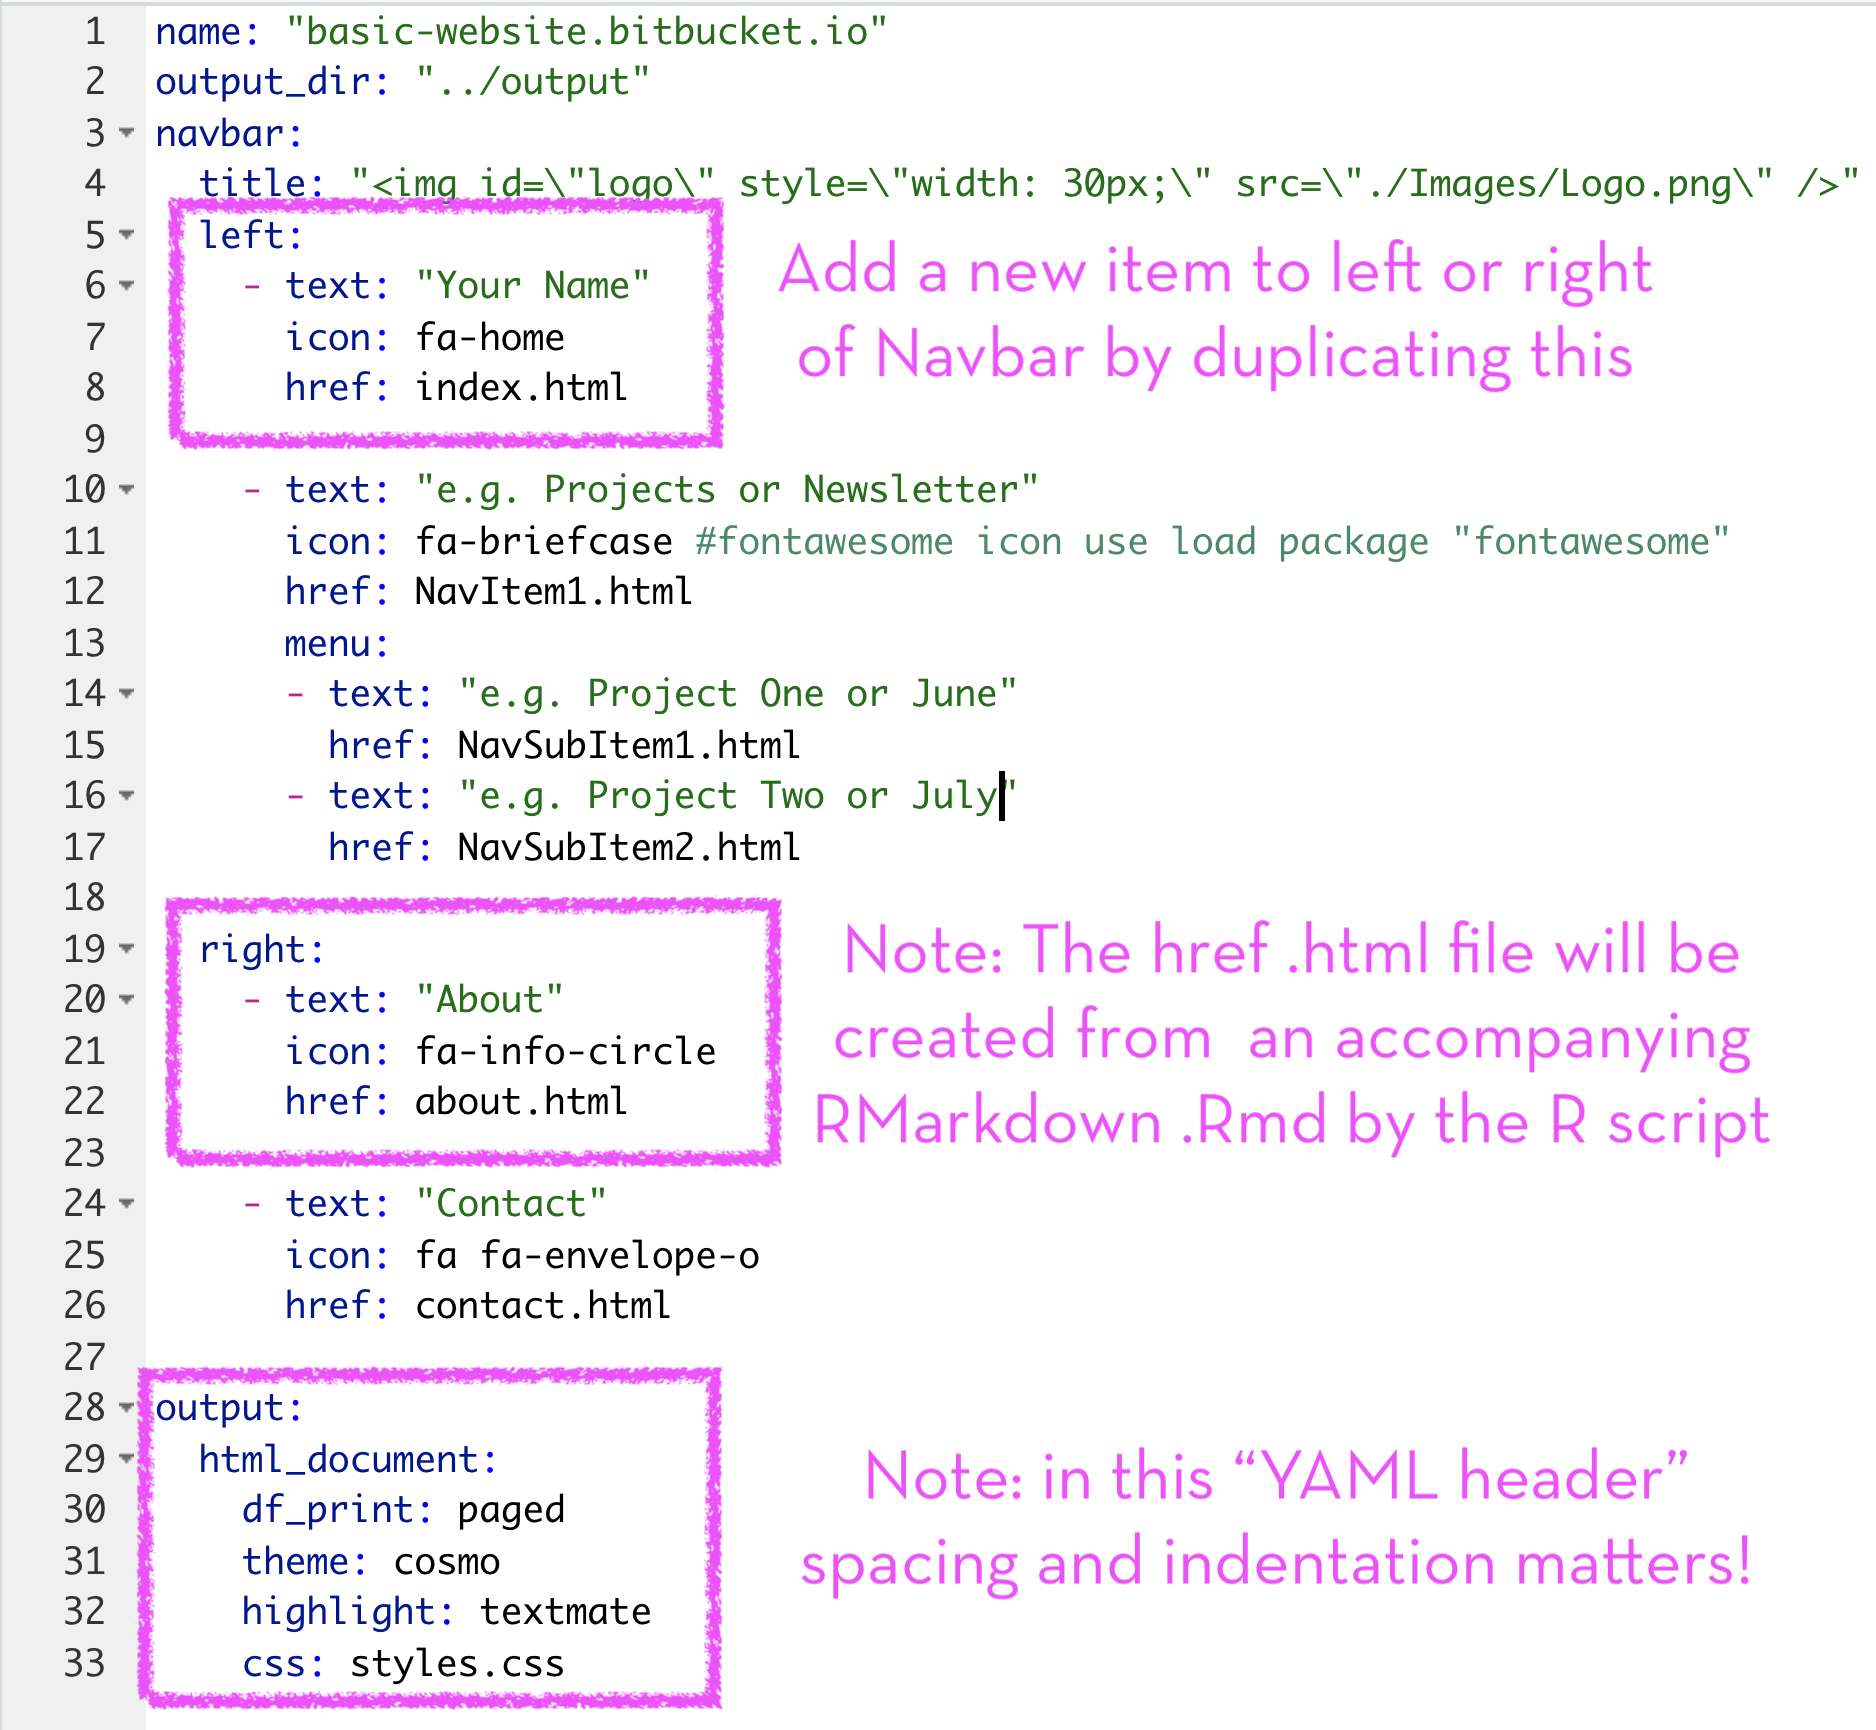
Figure 5: Add an Item to Navbar. Pay Particular Attention to Indentation.
Caveat: Spacing, Sp…aci..ng Matters A Lot
A pitfall I run into often with RMarkdown is getting the spacing correct in the _site.yml file (and YAML in general). This was particularly challenging when one finds code on the web and one wants to copy-and-paste as the pasting might not preserve the required indentation/tabbing. Without understanding why and how to use dashes, - and indentations I always felt like I was guessing at the YAML file format. That is unti I very fortunately ran across the _site.yml example:
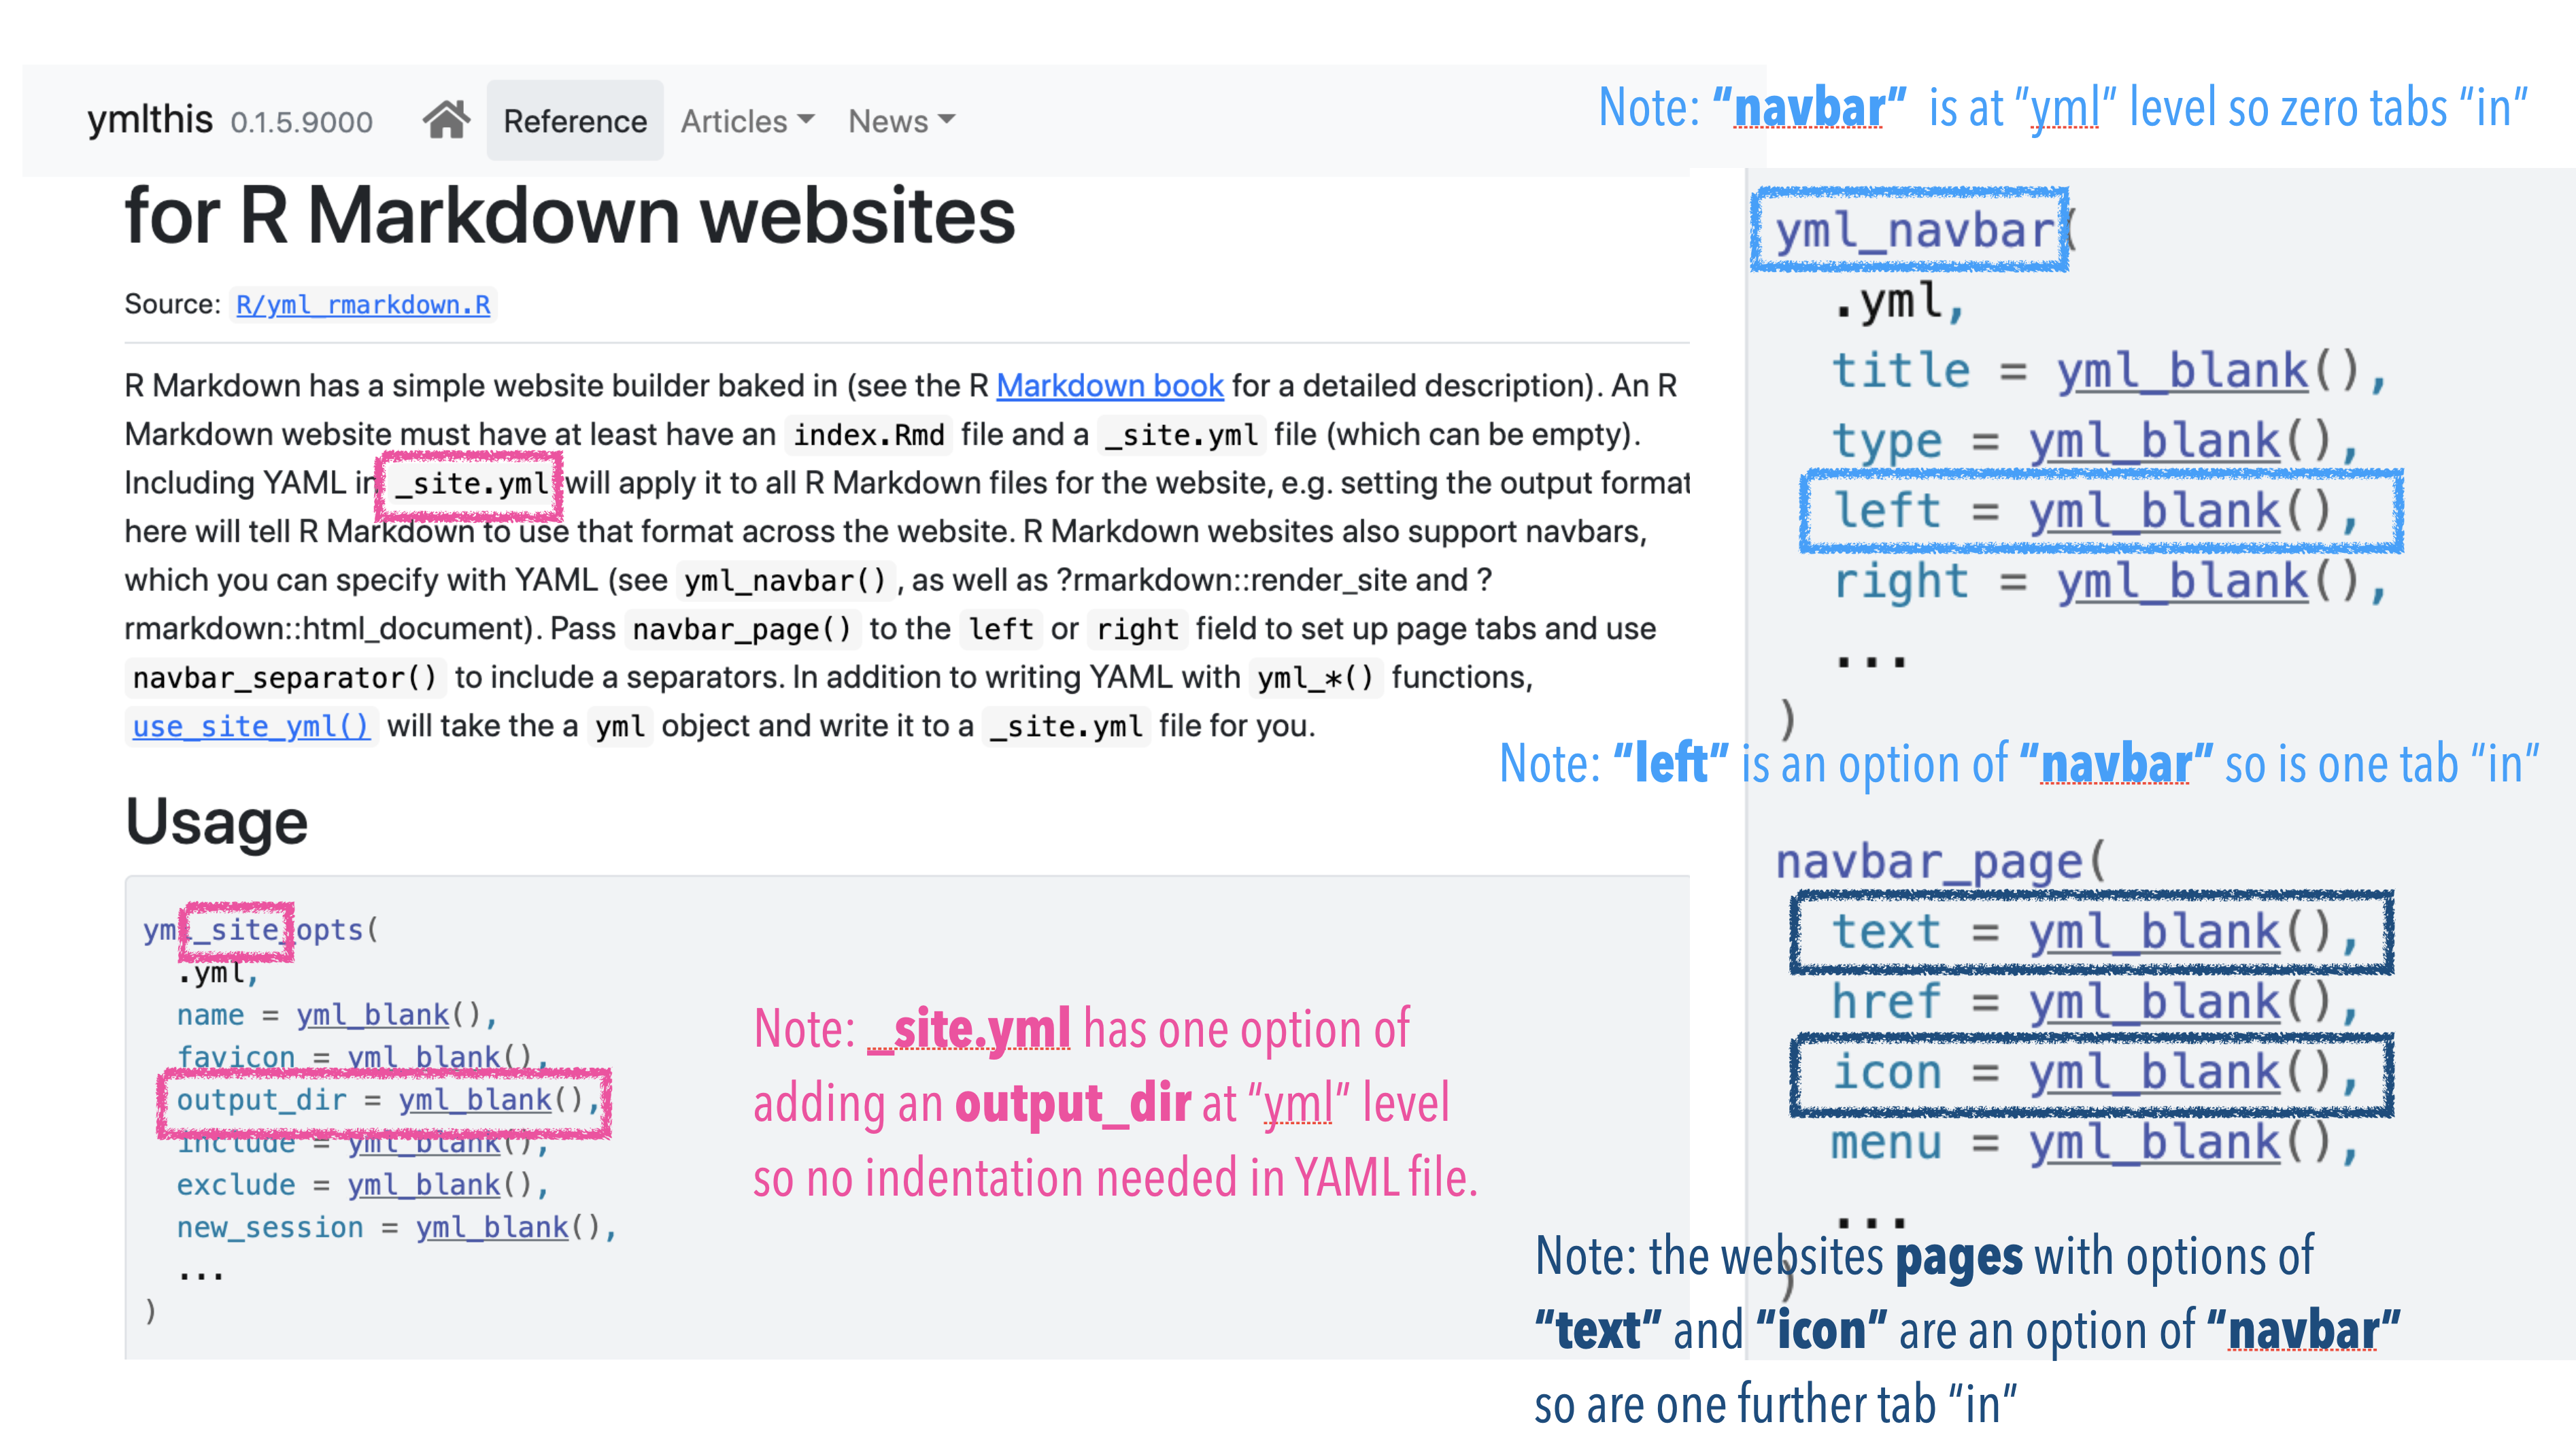
Figure 6: The When and How of YML Tabbing/Spacing. A See and Compare to Figure 7 Method of Understanding
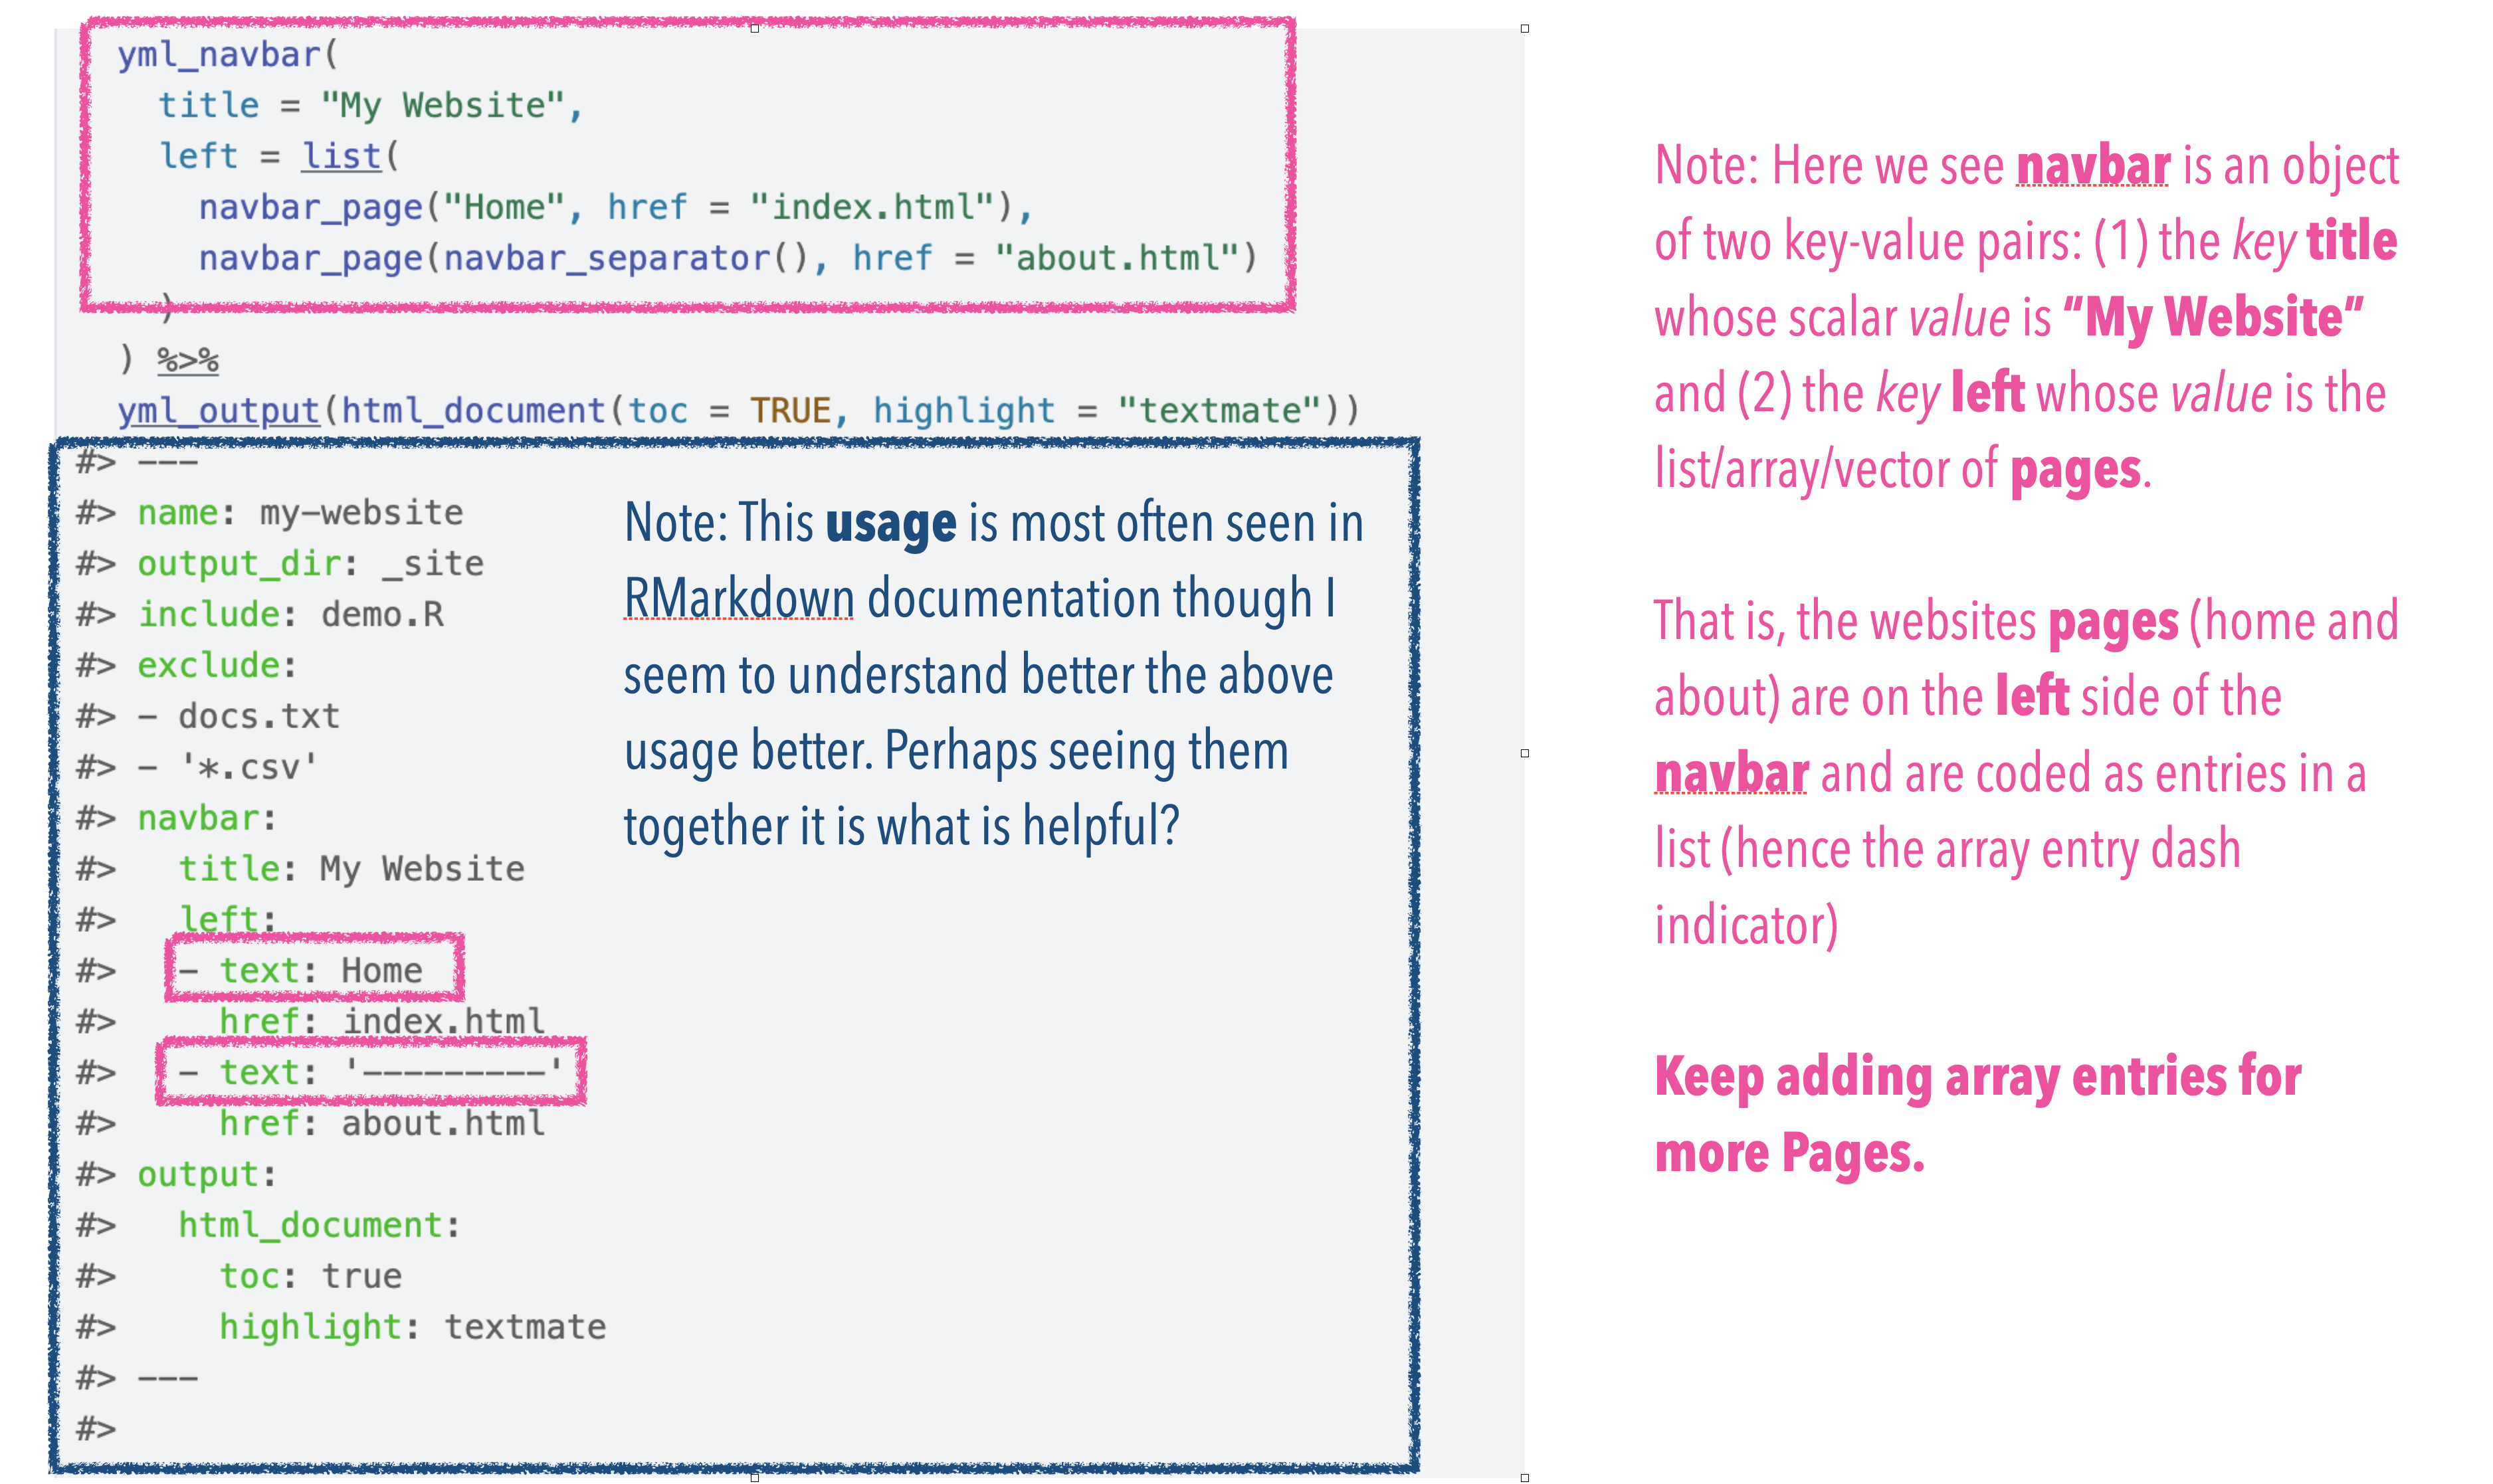
Figure 7: The Objects and Key-Value Pairs of _site.yml. The Correct Terminology
Modifying the Site: Add to the Body
The Bottom Body can be added to by editing the source file index.Rmd. This file will become your index.html file (which is your website landing page). Change the image and add a little tagline or summary to make this uniquely your site.
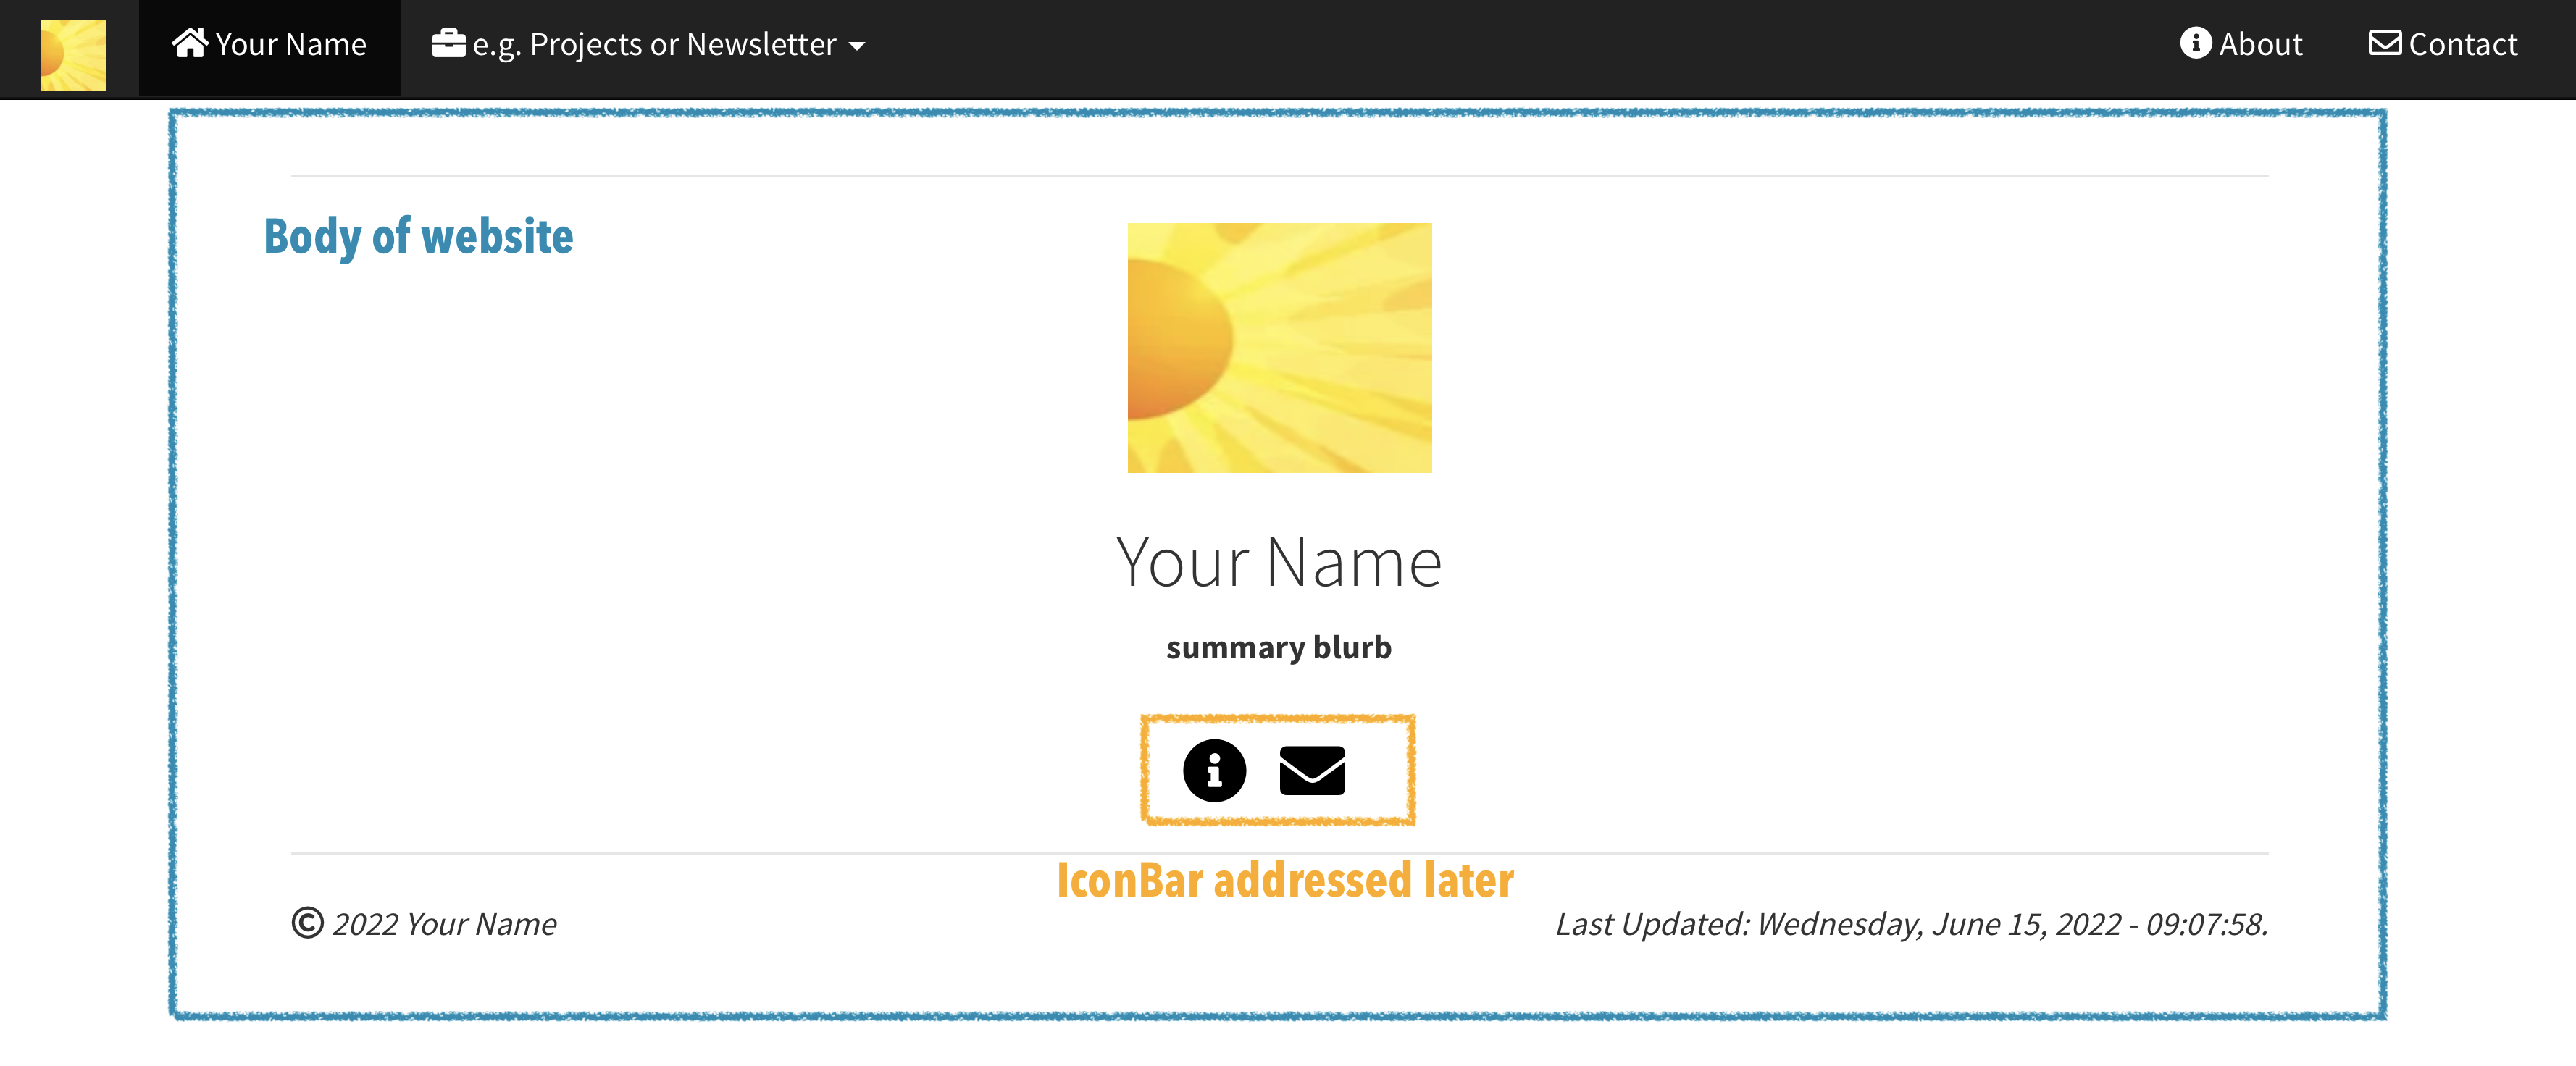
Figure 8: The Body/Index.html File A See and Compare to Figure 9 Method of Understanding
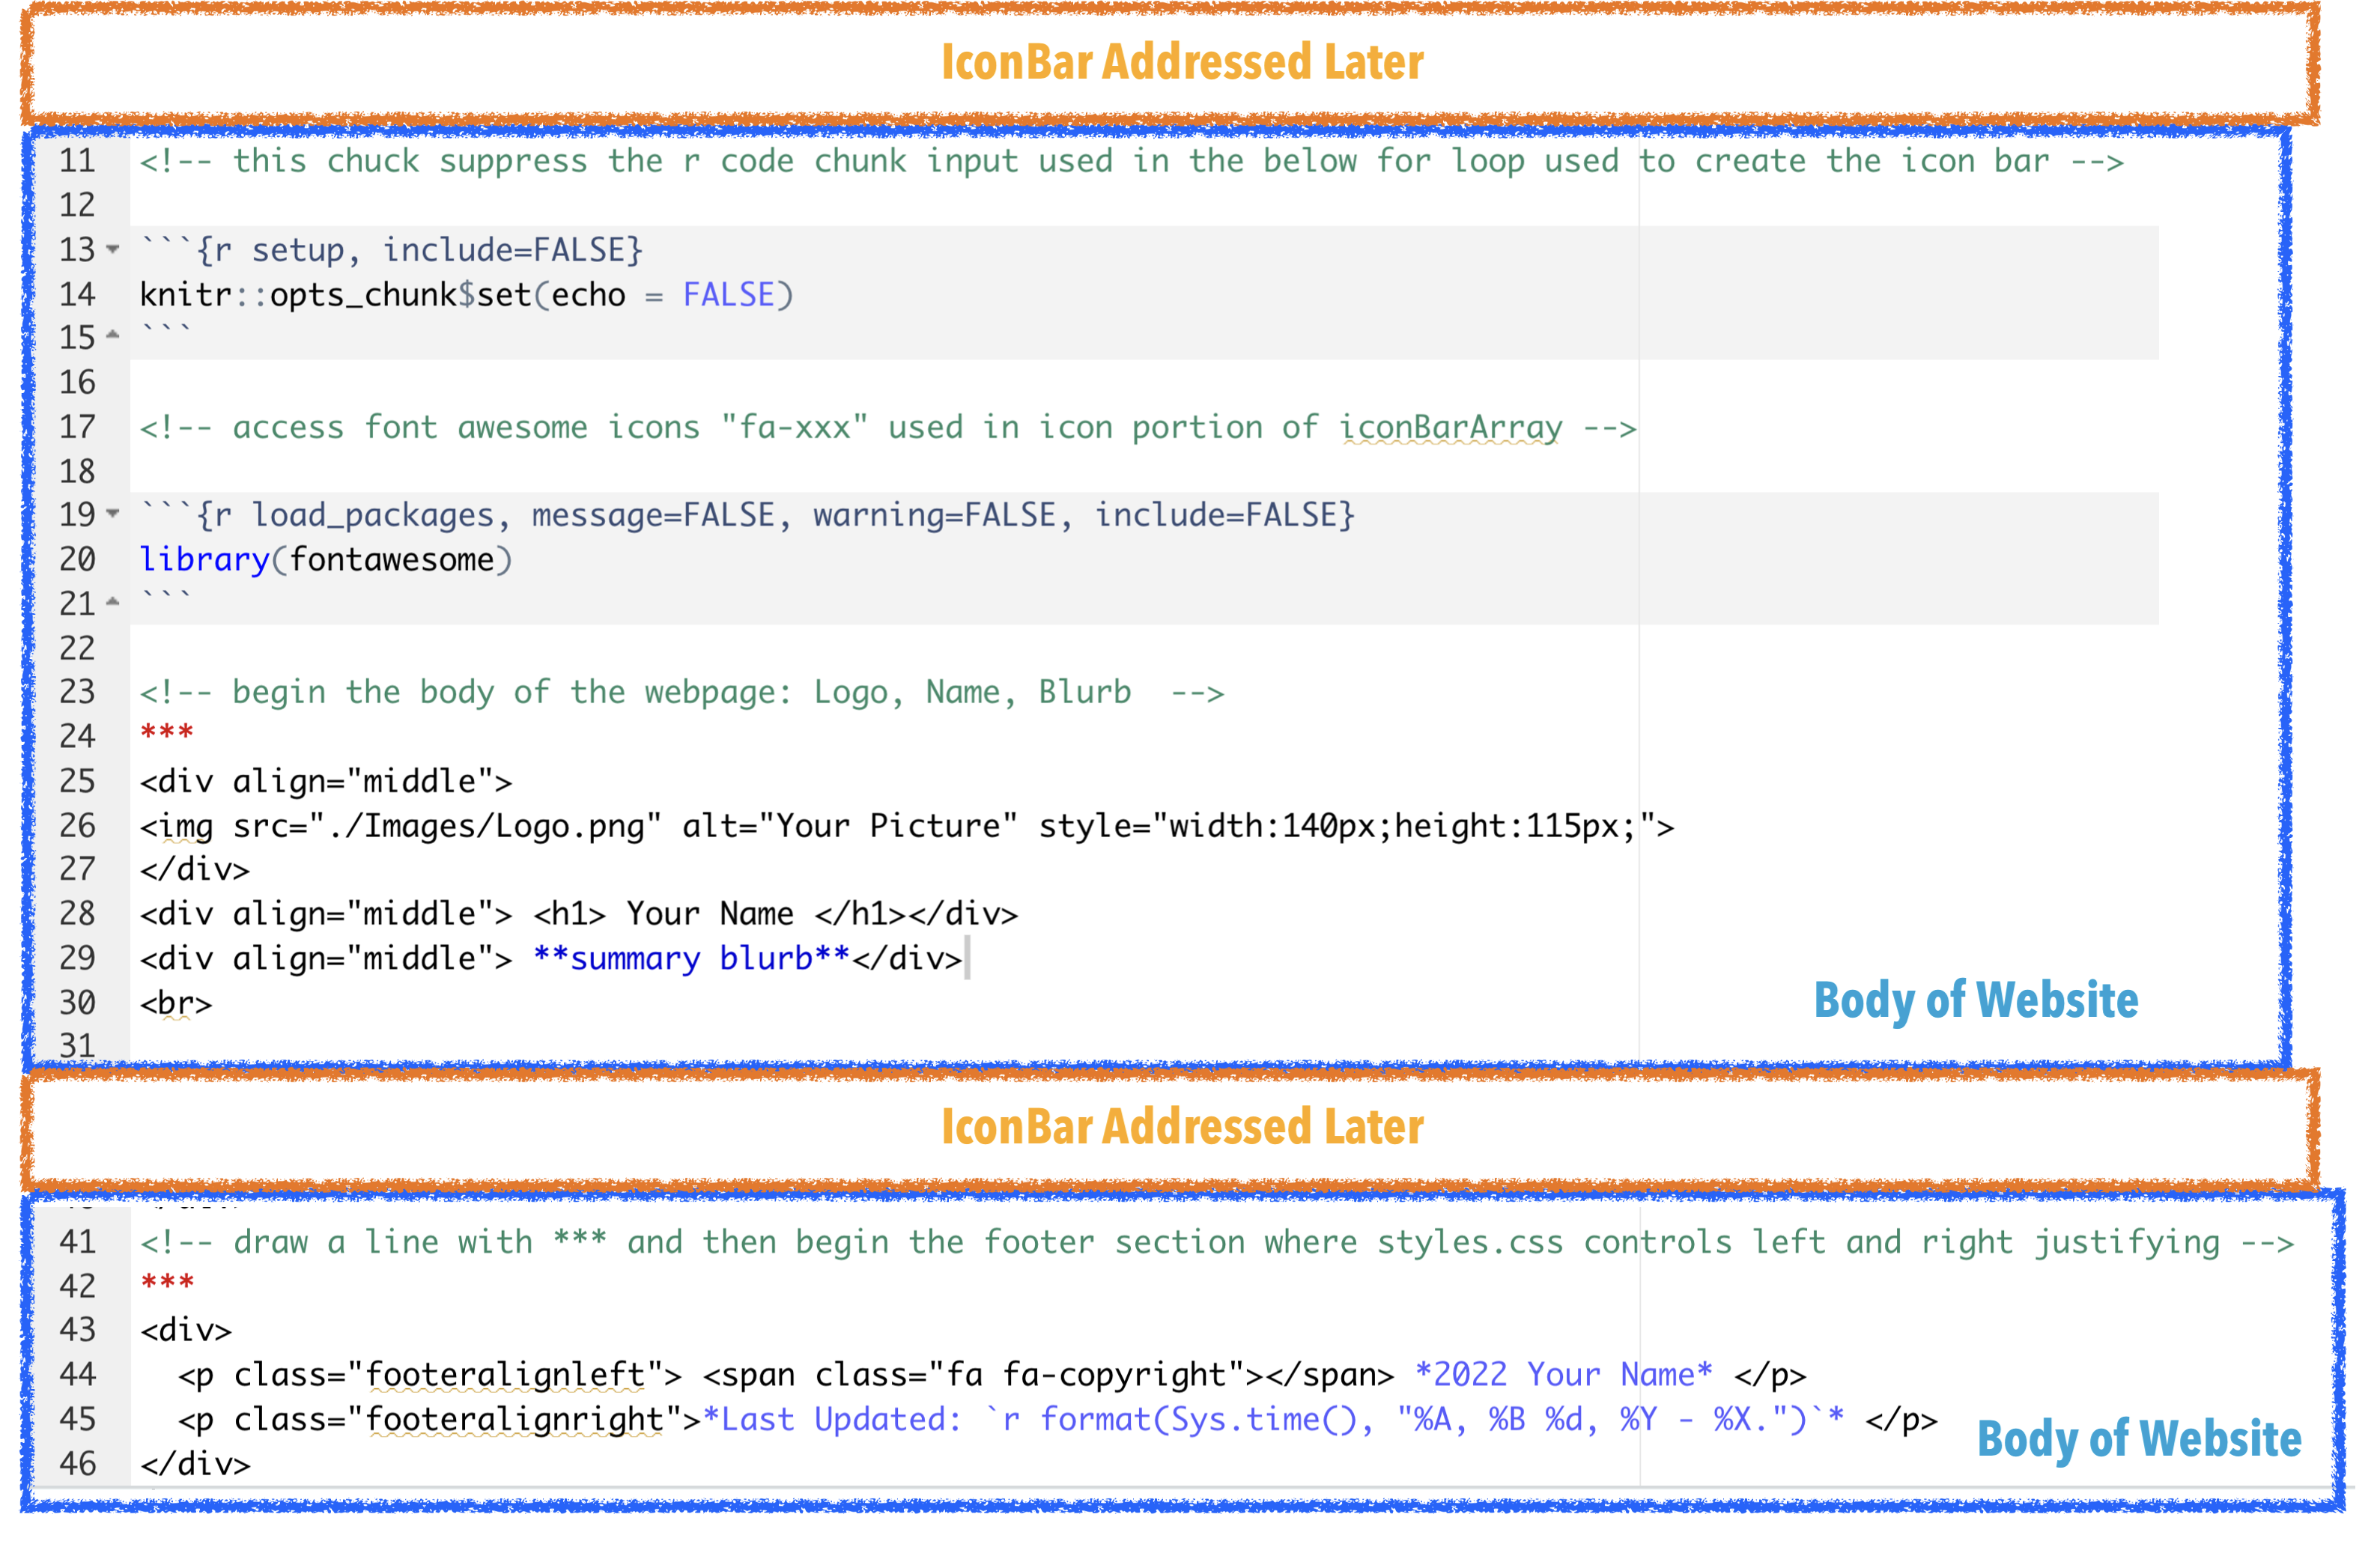
Figure 9: The Body/Index.Rmd File A See and Compare to Figure 8 Method of Understanding
Modifying the Site: Adding to the Icon Bar
The only really outside-the-norm part of our Basic RMarkdown Website is in the Icon Bar. To achieve this feature was an excellent exercise in learning to define and call array variables from the YAML header of the index.Rmd file using an R code block. The defining of array variables in the YAML header and getting them into our webpage via cat (concatenate) is a strategy that we use often when extending our Basic Website to an actual Blog. See a future post about the development of our Blog.
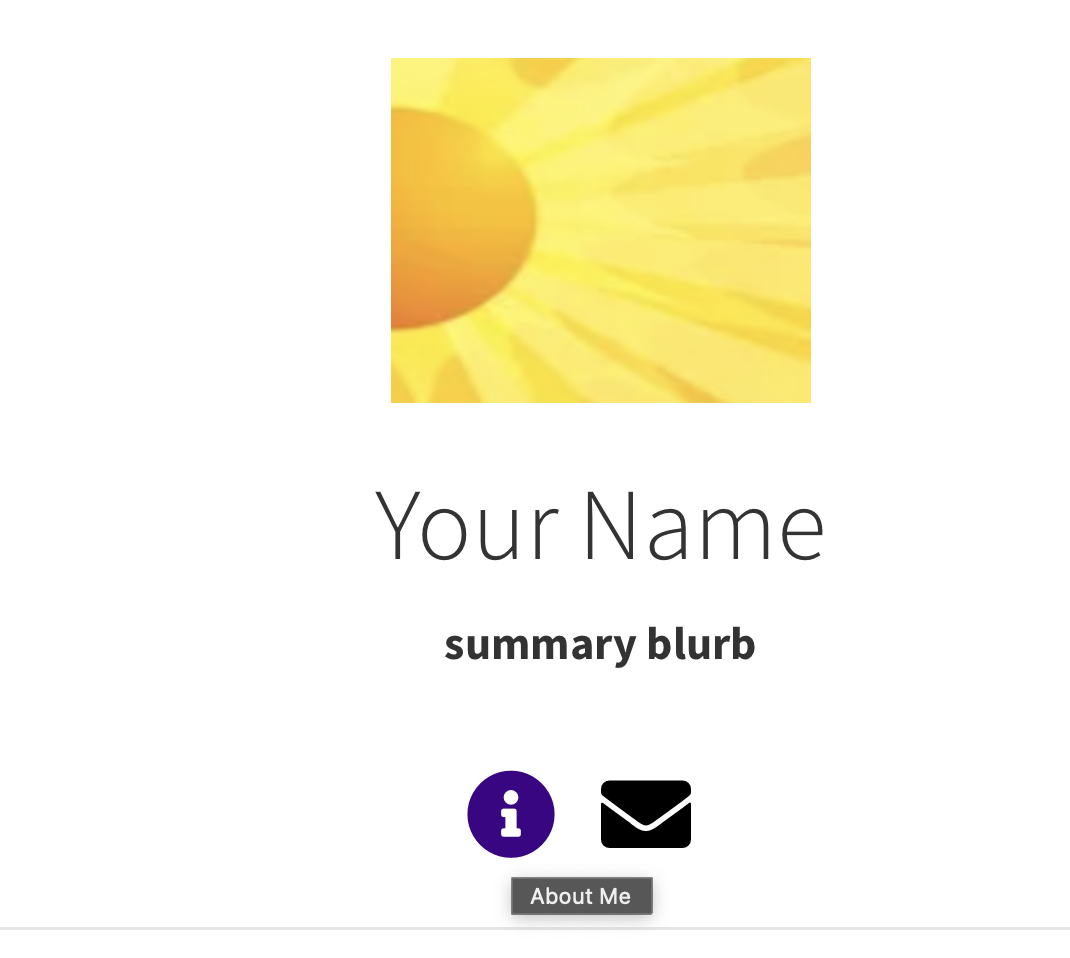
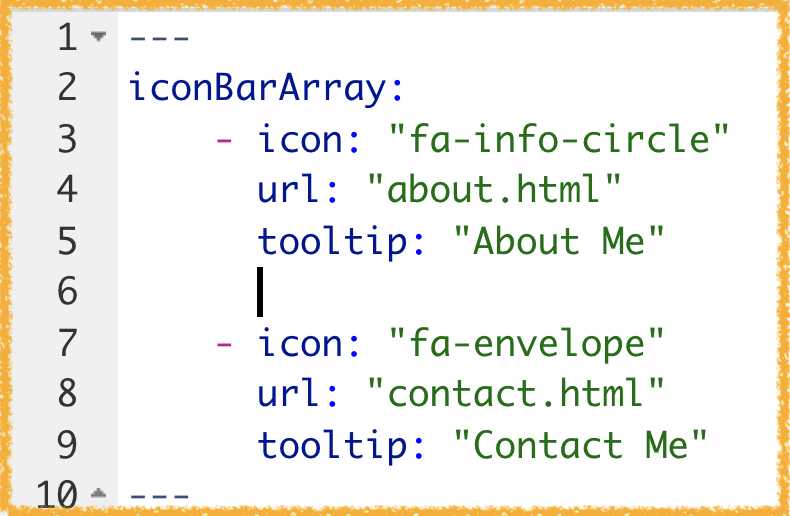
Figure 10: Icon Bar and Icon Bar Array Variables. (top/left) The Icon Bar (bottom/right) The YAML Header of index.Rmd. The code in the YAML header (as indicated by ___) defines the Key iconBarArray With Array Value icon-url-tooltip and is the first 10 lines that partly complete the index.Rmd shown in Figure 9.
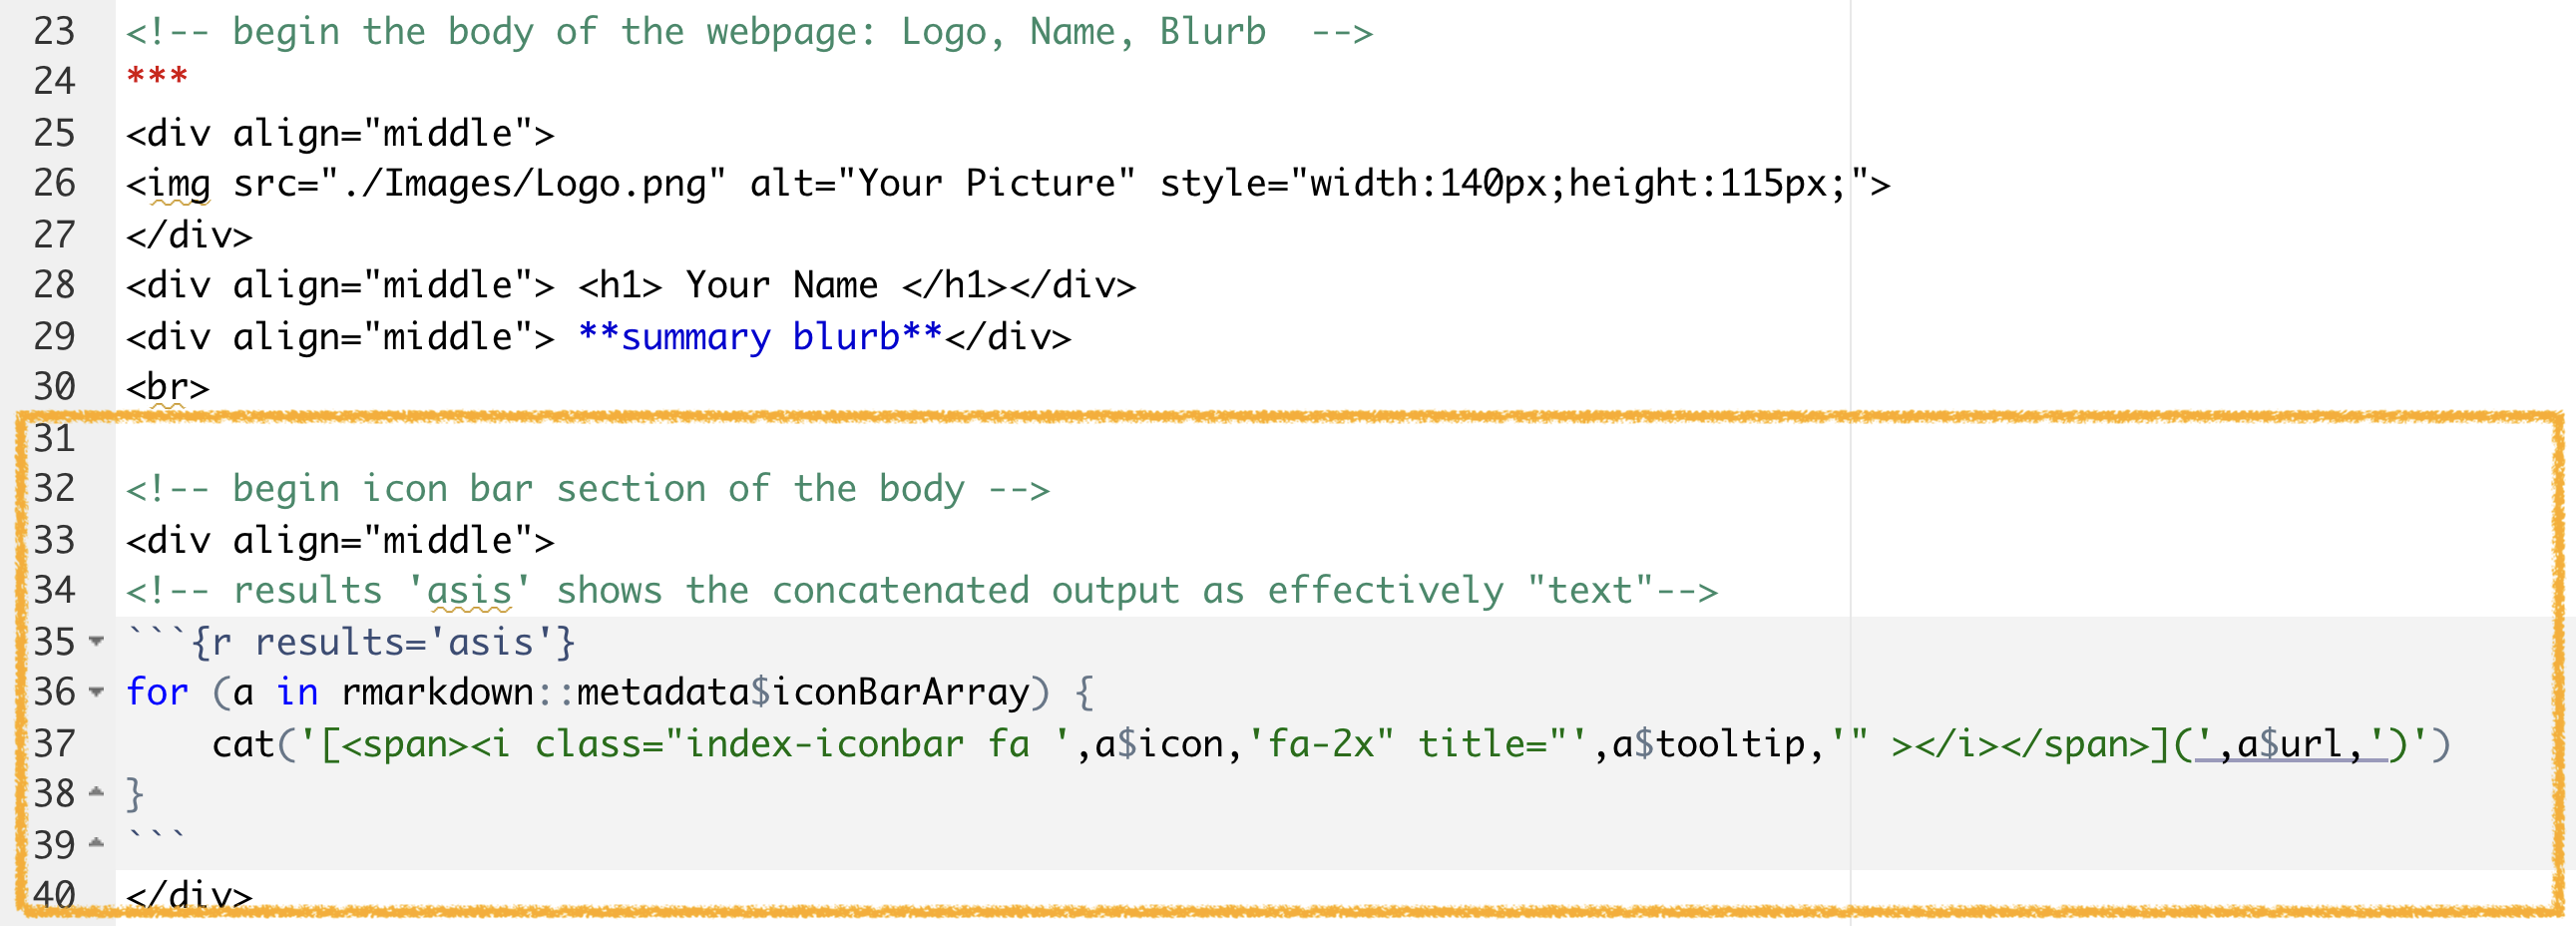
Figure 11: Icon Bar Array R Code Chunk. The code above are the middle lines which finally complete the index.Rmd shown in Figure 9.
Building the Site via an R renderscript: Writing Necessary Files to a Single Output Folder
At this point you have:
- added all your sites pages via the navbar in the file _site.yml
- add all your social icons (twitter, github, bitbucket, reddit, etc.) in the body of your site in the file index.Rmd
Your BasicWebsite-RMarkdown folder and file structure at this point might look something like that seen in Figure 12.
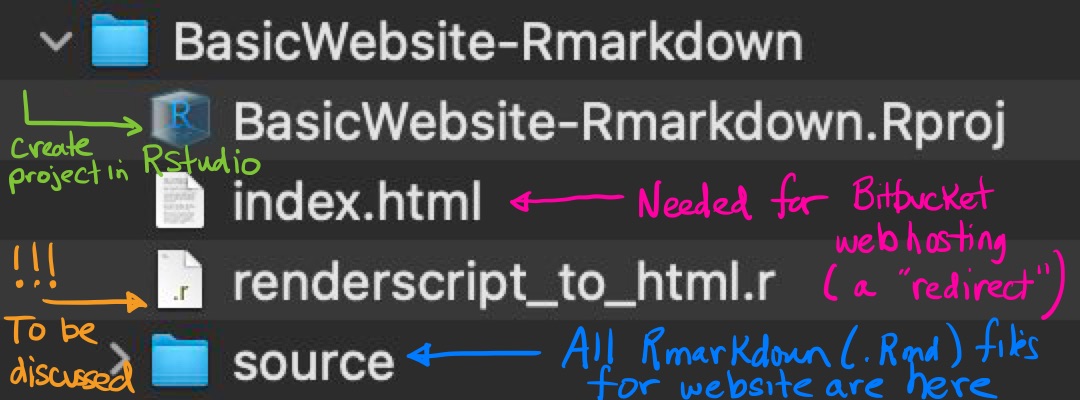
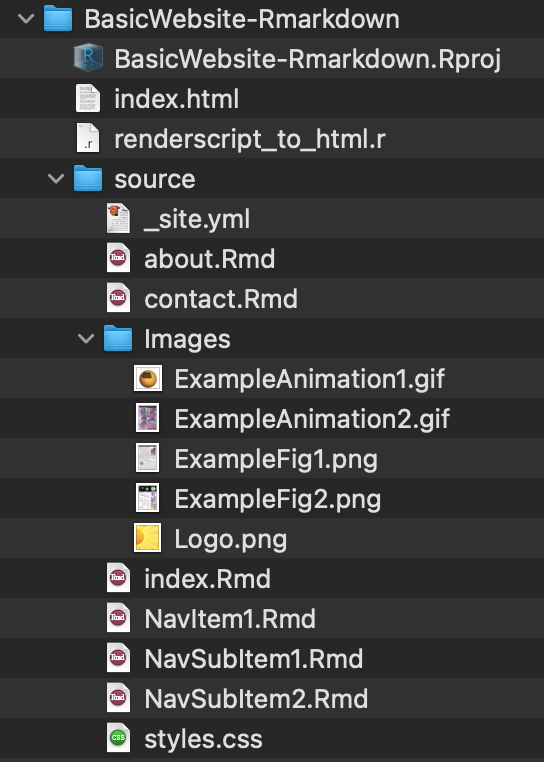
Figure 12: Source Files On Which to use an R/RMarkdown script render_site. I make the BasicWebsite-RMarkdown folder a project in RStudio which, to my understanding, sets the ./ home directory. I am hosting my site on Bitbucket, so Bitbucket is expecting an index.html file in the home directory (this file is simply a redirect to the index.html which will be writtten from the index.Rmd) when we run the R renderscript.
- Final Step: You are now ready to run the R/RMarkdown renderscript seen in Figure 13 to create a single self contained output folder of .html’s for your basic website!
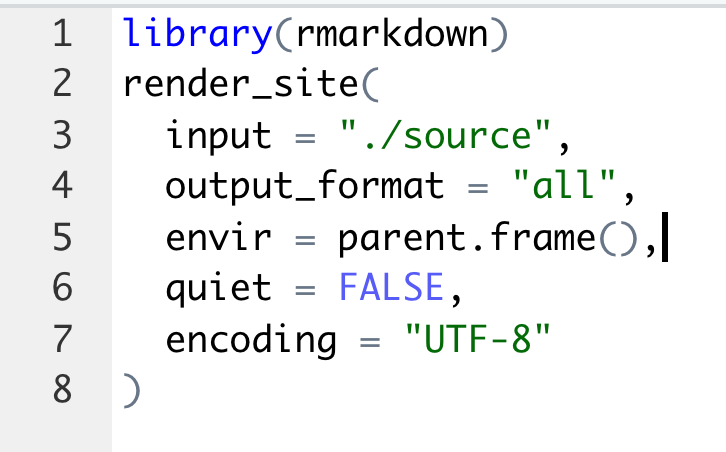
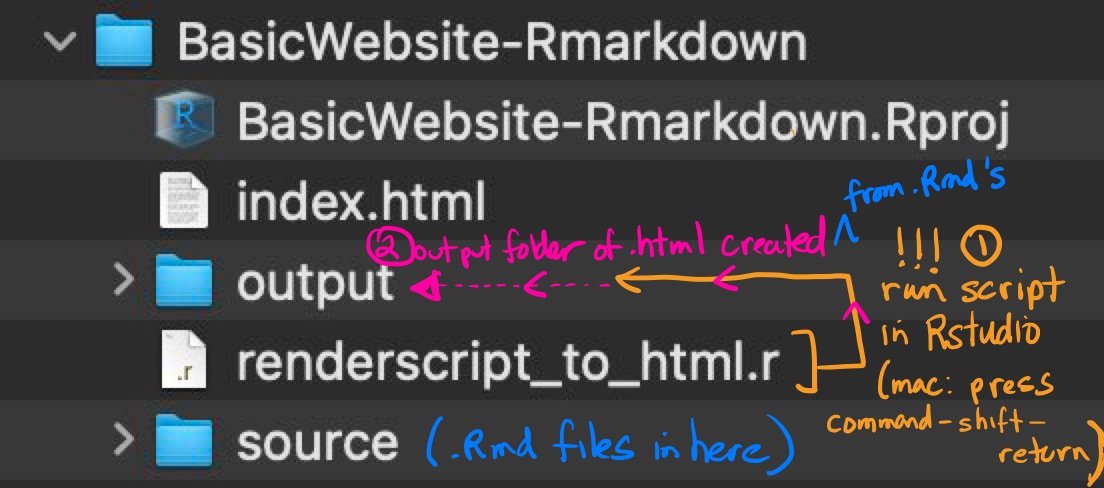
Figure 13: An R/RMarkdown Renderscript Using render_site. (top/left) Execute the code by pressing together (on Mac) command-shift-return. (bottom/right) All of your source files have now been complied to .htmls, your Images copied over, and a folder site_libs has been created which hooks all of your pages together (seen in Figure 14).
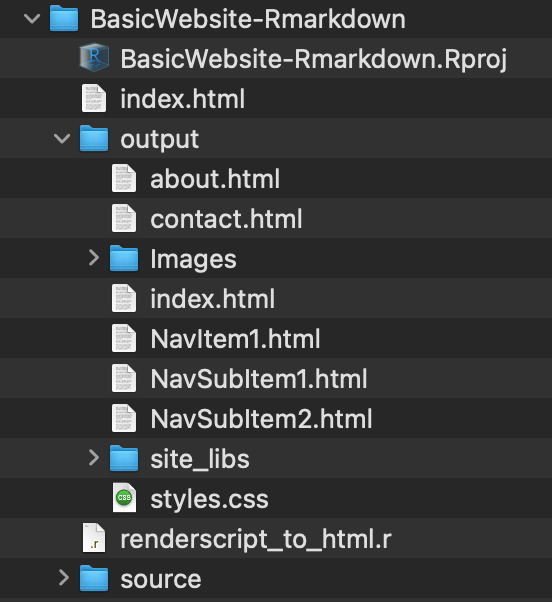

Figure 14: Your Finished Website All In A Single Folder. Voila
Getting to Go
If you have found this post interesting and wish to try something like it too, then you will likley need to bring a variety of tools together.
Having just recently acquired a new Mac, I took notes on all the system setup/installs that I needed to be able to build the above website and blog about it.
- Installed (Homebrew) at Mac Terminal command line
/bin/bash -c "$(curl -fsSL https://raw.githubusercontent.com/Homebrew/install/HEAD/install.sh)"
- Note: Homebrew was installed on a machine with an Apple m1 chip in /opt/homebrew which is not on the default path of /usr/local/bin (found default from command line by echo $PATH). This needs to be resolved by pointing Mac to the brew install location by following the directions in (Homebrew Install Apple M1 Chip). Essentially we need to add Homebrew to our PATH by creating a ~/.zprofile (if not already present) and by adding the below to our ~/.zprofile
touch .zprofile
echo 'eval "$(/opt/homebrew/bin/brew shellenv)"' >> ~/.zprofile eval "$(/opt/homebrew/bin/brew shellenv)
- Note: Checks that “Your system is ready to brew”*
brew doctor
- Installed emacs from command line
brew install emacs
- Note: Checks that packages installed
brew list
- Note: Shows graphically how these packages are related
brew deps —-tree —-installed
- Installed git and R via brew
brew install git
brew install R
- Note: Create (if not already present) and add below to ~/.zshrc file to enable git command complete at Mac Terminal command line
touch .zshrc
autoload -Uz compinit && compinit
Followed directions (ssh key-gen for git)
Installed (Rstudio IDE) with packages rmarkdown, bookdown, and font awesome